Applicable Models:
- Razer Huntsman Signature Edition | RZ03-0551
- Razer Huntsman V3 Pro Mini | RZ03-0499
- Razer Huntsman V3 Pro Tenkeyless | RZ03-0498
- Razer Huntsman V3 Pro | RZ03-0497
- Razer Huntsman V3 Pro 8 kHz | RZ03-0553
- Razer Huntsman V3 Pro Tenkeyless 8 kHz | RZ03-0552
- Razer Huntsman V3 Tenkeyless 8 kHz | RZ03-05750
- Razer Huntsman V3 HE Magnetic Mini 65% 8 kHz | RZ03-0593x
- Razer Huntsman V3 HE Magnetic Tenkeyless 8 kHz | RZ03-0592x
The Rapid Trigger mode feature in several Razer keyboards allows keys to reset and register again as soon as they are released, enabling faster and more responsive key presses.
Follow the instructions below to customize the Razer keyboard's Rapid Trigger mode.
Step-by-step Process
-
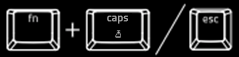
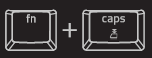
Press the “fn” + “caps lock” keys to enter the Adjustment mode.
Note: In Adjustment mode, all non-essential keys and lighting customizations are temporarily disabled. The quick adjustment settings do not permanently overwrite the Razer Synapse profiles. Previously set profiles are recalled through the Razer Synapse.
-
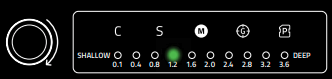
Rotate the Multi-function Digital Dial or press the keyboard’s arrow keys to increase or decrease the travel distance. Use the LED indicators to determine your ideal setting (in millimeters).
-
Press any alphanumeric key to test the current setting.
Note: When a key is pressed and released, the key’s backlight turns green when actuated and red when it resets.
-
Press the “fn” + “caps lock” keys or “esc” key to save your settings and exit the Adjustment mode. All keys on the keyboard will be set to the chosen sensitivity.