How to assign macros on Razer Synapse-enabled products

| Answer ID: 1751
This answer shows you how to assign macros on Razer Synapse-enabled products.

Effective February 3, 2026, Razer Synapse 3 will no longer receive updates or support cloud services. After this date, cloud syncing of configurations across PCs using the same Razer ID will be disabled.

Note: Your installed devices will continue to be configurable in Razer Synapse 3. However, if you uninstall these devices completely, you will need to upgrade to Razer Synapse 4 to continue customization.

Download Razer Synapse 4 and migrate your existing Razer Synapse 3 profiles using the Profile Migration Tool to retain access to your configurations. See How to migrate your Razer Synapse 3 Profile to Razer Synapse 4 for instructions.

A "macro" is an automated set of instructions (multiple keystrokes or mouse clicks) that can be performed using a simple action such as a single keystroke.

Below are the steps on how to assign macros on Razer Synapse-enabled products.

Select Razer Synapse version

Razer Synapse 4

Important: Create at least one macro to proceed. See How to create or delete macros on Razer Synapse for instructions.

You can view the video below for instructions or review a copy of the video transcript.

  1. Open Razer Synapse 4.

  2. Select your device from the “DASHBOARD”.

  3. Select a key or button to assign a macro to. Be aware that there are keys that you cannot remap or assign a macro to such as “Windows” and “FN”.

    Device tab in Razer Synapse

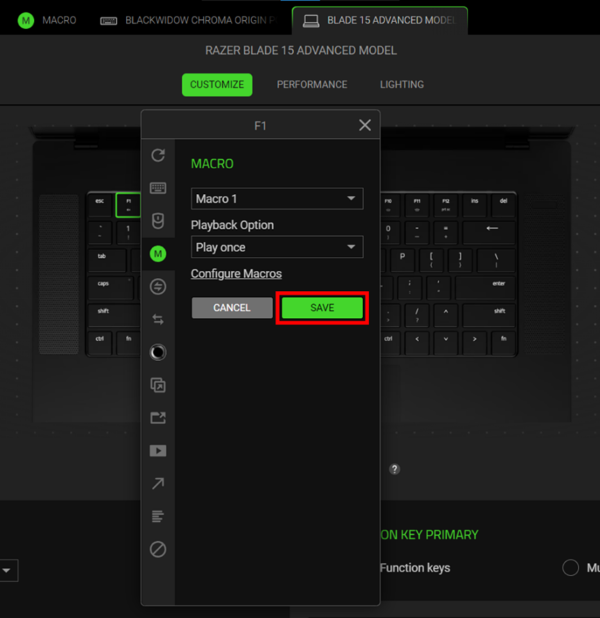
  4. Select “MACRO” from the menu pane that appears.

    Customize menu pane

  5. Click the macro dropdown list and select a macro.

    Customize menu pane

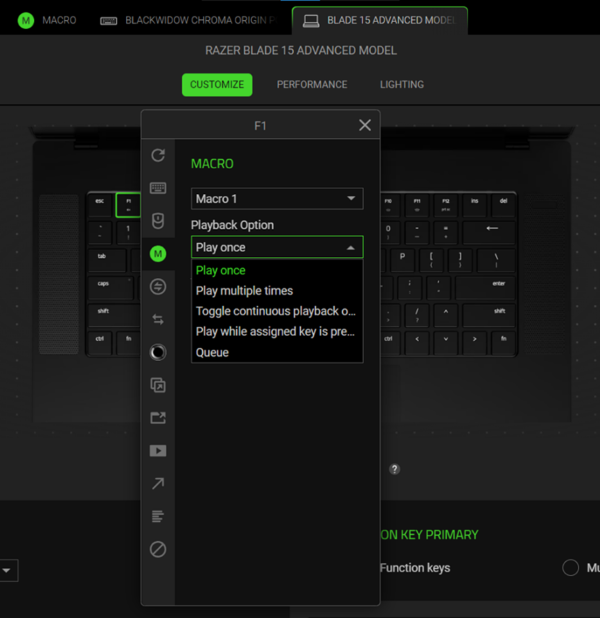
  6. Select a playback option.

    Customize menu pane

  7. Click “SAVE”.

    Customize menu pane

Razer Synapse 3

To use macros within Razer Synapse 3, create the macro first within Razer Synapse 3 and then assign it to any of your Razer Synapse 3-enabled products. See How to create macros on Razer Synapse 3-enabled Razer products for detailed instructions.

You can view the video below for instructions.

Step-by-step process

  1. Plug your Razer Synapse 3-enabled product into your computer.

  2. Open Razer Synapse 3.

  3. Select the device you wish to assign a macro to.

    Note: If "MACRO" is missing from the options at the top of Synapse, see the answer below for instructions on how to restore it.

  4. Click on the key you wish to assign the macro to.

  5. Select “MACRO” from the left-hand column that appears.

  6. Under “ASSIGN MACRO”, select the macro you wish to assign from the dropdown menu.

    Assign Macro window in Synapse 3

  7. Select the option you wish under “Playback Option” if you wish to play the macro more than once per keystroke.

    PLayback options under Assign Macro

  8. Click “SAVE”.

    Save option under assign macro

Your macro has been successfully assigned. Test your macro key assignment by opening “WordPad” or “Microsoft Word” and pressing your selected key.

Is this answer helpful?