
The Razer Core is an external enclosure for your graphics card (eGPU) that boosts your gaming experience by enhancing your laptop’s graphics processing performance.
Properly setting up the Razer Core is important to avoid issues or any damages to components.
Before proceeding, you will need the following:
- Razer Core
- Razer Core compatible PCI-E graphics card
- GPU Driver (NVIDIA or AMD)
- PC with Thunderbolt 3 external graphics support
- External monitor (optional)
To see a list of Razer Core-supported Razer Blade models, check out Razer Core | RC21-00940 Support and FAQs.
You can view the video below for instructions or review a copy of the video transcript.
Follow the steps below to set up the Razer Core properly:
-
Ensure the operating system on your laptop is up to date. See How to get the latest software and driver updates from Windows.
If you just updated Windows, please install the "Optional updates" under Settings > Windows Update > Advanced options.
-
Install the graphics card into the Razer Core. To do so:
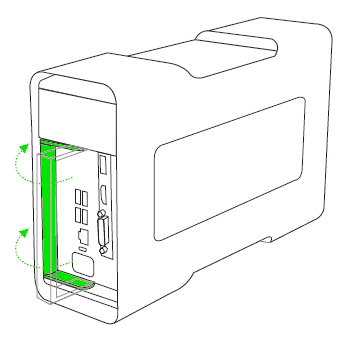
- Pull the lever to unlock.

- Pull out the compartment from the enclosure.

- Peel off the tape and remove the protective foam.

- Remove the PCI-E slot cover and thumbscrew.

- Insert the compatible graphics card into the PCI-E port.

- Re-insert the PCI-E thumbscrew.

- Plug the GPU power connectors into the graphics card.

- Push the compartment into the enclosure until completely shut.

- Push the lever to lock the compartment.
- Pull the lever to unlock.
-
Connect the Razer Core to a power outlet using the provided power cable.

-
Connect the Razer Core to your laptop using the Thunderbolt 3 (USB-C) cable.

-
If you want to use an external monitor, connect the monitor to the Razer Core using a compatible display cable to the installed graphics card (this can either be a DisplayPort, HDMI, or even DVI).

-
Download and install the software drivers for the graphics card you installed in the Razer Core. Depending on the model, you may have an NVIDIA or AMD graphics card.
Ensure that the Razer Core and the graphics card are properly connected to your computer before installing the drivers.
-
Launch Razer Synapse on your laptop and log in with your account. Wait until Razer Synapse has finished downloading the drivers for the Razer Core.
-
Restart your system if prompted.
You can now enjoy a more enhanced gaming experience using the Razer Core.

