
A beginner-friendly guide to building your machine learning development environment—on the world’s most advanced AI-ready laptops.
See instructions below
Installing the Latest NVIDIA Drivers on Ubuntu 24.04 (For RTX 5070, 5060, and Blackwell GPUs)
If you’re an AI developer setting up Ubuntu 24.04 on a machine with a cutting-edge NVIDIA GPU like the RTX 5070, RTX 5060, or the RTX PRO 5000 Blackwell Generation Laptop GPU, you may find yourself stuck. Ubuntu’s built-in driver tools are helpful—but only up to a point.
These new GPU models are so fresh that their drivers haven’t yet landed in the standard GUI tools like “Additional Drivers.” This blog post walks you through installing the latest NVIDIA drivers that aren’t (yet) available through the usual point-and-click methods.
Standard Method: “Install Third-Party Software” During Ubuntu Setup
When installing Ubuntu 24.04, you’re presented with the option to “Install third-party software for graphics and Wi-Fi hardware.”
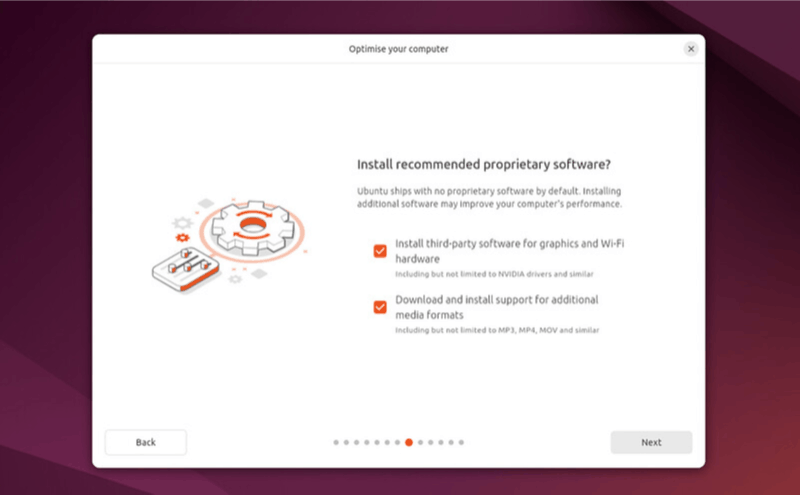
If selected, Ubuntu should automatically install the appropriate proprietary NVIDIA drivers during setup. For most users withwidely-supported GPUs, this checkbox is all you need.
But if you skipped that option, or if your GPU is too new to be recognized properly, don’t worry—there are workarounds.
The “Additional Drivers” Utility
After Ubuntu is installed, you can still install NVIDIA drivers using the “Additional Drivers” GUI tool. This is the typical route for those who skipped third-party software installation earlier.
To access it:
-
Open the “Software & Updates” app.
-
Go to the “Additional Drivers” tab.
-
Select the latest proprietary and tested NVIDIA driver.
-
Click Apply Changes, then reboot.
However, this method breaks down for certain new GPUs…
When “Additional Drivers” Fails: Blackwell GPU Driver Gap
If you own a laptop or workstation with:
-
RTX 5070
-
RTX 5060
-
RTX PRO 5000
-
Or another Blackwell generation mobile GPU
You may notice that no NVIDIA driver is available in the Additional Drivers window.
Why?
This is due to a known issue: driver packaging for these GPUs is still catching up in Ubuntu's driver management system.
See references:
The Fix: Installing NVIDIA Driver 570 (Open Kernel Version) via Terminal
The easiest workaround right now is to manually install the latest open version of NVIDIA Driver 570 from the command line.
Here’s how to do it:
Step 1: Open Terminal
You can do this from the application menu or by pressing Ctrl + Alt + T.
Step 2: Update Package Lists
1 sudo apt-get update
Step 3: Install the Open Version of Driver 570
1 sudo apt-get install nvidia-driver-570-open
This version supports the latest Blackwell series and works reliably with most AI workloads, including CUDA, PyTorch, and TensorFlow environments.
Step 4: Reboot
1 sudo reboot
Once rebooted, you can verify the installation using:
1 nvidia-smi
You should now see your GPU listed along with the 570 driver version, confirming that the system has correctly recognized your hardware.
Conclusion
While Ubuntu 24.04 is an excellent foundation for AI development, support for brand-new GPUs can take a while to filter into the official GUI tools. Thankfully, Ubuntu’s flexibility and the open version of NVIDIA’s drivers give us a reliable path forward.
If you're working with Blackwell-generation GPUs and need GPU acceleration working today, the nvidia-driver-570-open package is your best friend.
Ubuntu 24.04 is a Linux distribution developed and maintained by Canonical Ltd. All trademarks and copyrights are property of their respective owners.
NVIDIA® GPUs referenced in this content are products of NVIDIA Corporation. All trademarks and copyrights are the property of their respective owners.
How to Set Up a Multi-Node Kubernetes Cluster for AI Development Using MicroK8s and Multipass on Ubuntu 24.04
Kubernetes has become the de facto standard for container orchestration in modern software development, especially in AI and ML workflows. But learning Kubernetes can be daunting if you're limited to a single-node setup. In this guide, we walk you through building a multi-node Kubernetes cluster on your local Ubuntu 24.04 machine, using Multipass and MicroK8s, tailored for AI developers who want a realistic and scalable local environment.
Why a Multi-Node Setup on Localhost?
For AI developers working on model training, serving APIs, or distributed workloads, understanding how workloads are scheduled and managed across a Kubernetes cluster is crucial. A multi-node setup replicates the architecture of production-grade clusters, enabling local testing of:
-
Distributed AI pipelines
-
Load balancing across nodes
-
Persistent storage scenarios
-
Multi-container service architectures
Overview of the Tools
-
Multipass: A lightweight VM manager for Ubuntu. It allows you to spin up multiple VMs with minimal effort.
-
MicroK8s: A lightweight Kubernetes distribution optimized for IoT and edge—but powerful enough for your AI workloads.
Step-by-Step Setup Guide
1. Install Multipass
1 sudo snap install multipass
This installs the VM manager you'll use to create and manage Kubernetes nodes.
2. Launch Virtual Machines
You’ll need at least three VMs: one for the control plane and two for worker nodes.
For general Kubernetes workloads:
1 multipass launch --name microk8s-cp --cpus 2 --memory 2G --disk 10G
2 multipass launch --name microk8s-w1 --cpus 2 --memory 2G --disk 10G
3 multipass launch --name microk8s-w2 --cpus 2 --memory 2G --disk 10G
For more demanding setups like open-webui:
1 multipass launch --name microk8s-cp --cpus 2 --memory 3G --disk 20G
2 multipass launch --name microk8s-w1 --cpus 2 --memory 3G --disk 20G
3 multipass launch --name microk8s-w2 --cpus 2 --memory 3G --disk 20G
3. Set Up the Control Plane
1 multipass shell microk8s-cp
2 sudo apt update && sudo apt upgrade
3 sudo snap install microk8s --classic
4 sudo usermod -a -G microk8s $USER
5 newgrp microk8s
Enable key add-ons:
1 microk8s enable dashboard
2 microk8s enable hostpath-storage
3 microk8s enable metallb
Configure MetalLB with an IP range reachable by your host (e.g., based on Multipass network IP for the VMs).
Verify everything is enabled:
1 microk8s status
2 exit
4. Set Up the Worker Nodes
Repeat the following steps for microk8s-w1 and microk8s-w2:
1 multipass shell microk8s-wx
2 sudo apt update && sudo apt upgrade
3 sudo snap install microk8s --classic
4 sudo usermod -a -G microk8s $USER
5 newgrp microk8s
6 exit
5. Initialize the Cluster
On the control plane node:
1 multipass shell microk8s-cp
2 microk8s add-node
This outputs a join command. You'll need to run it for each worker VM.
6. Join Worker Nodes
On each worker VM:
1 microk8s join <IP>:<PORT>/<TOKEN> --worker
Replace <IP>:<PORT>/<TOKEN> with the values given by microk8s add-node.
7. Verify the Cluster
On the control plane node:
1 microk8s kubectl get nodes
You should see:
1 NAME STATUS ROLES AGE VERSION
2 microk8s-cp Ready <none> ... ...
3 microk8s-w1 Ready <none> ... ...
4 microk8s-w2 Ready <none> ... ...
To simplify the command:
1 alias kubectl='microk8s kubectl'
Add this alias to your .bashrc and apply the changes by running:
1 source .bashrc
8. Manage Kubernetes from Host Machine
On your host, install microk8s:
1 sudo snap install microk8s --classic
Run:
1 multipass exec microk8s-cp -- microk8s config
Copy the output to a file on your host machine, e.g., ~/.kube/config.yaml.
Add the following alias to .bashrc:
1 alias kubectl="microk8s kubectl --kubeconfig=$HOME/.kube/config.yaml"
Apply the changes by running:
1 source .bashrc
Use it to query the nodes in the multi-node Kubernetes cluster:
1 kubectl get nodes
9. Deploy a Sample App
1 kubectl create deployment nginx --image=nginx
2 kubectl get deployments
3 kubectl expose deployment nginx --port=80 --type=NodePort
4 kubectl port-forward deployment/nginx 8080:80
Visit http://localhost:8080 to see the running app.
To clean up:
1 kubectl delete deployment nginx
10. Access Kubernetes Dashboard
From microk8s-cp:
1 microk8s enable dashboard
2 kubectl get -n kube-system pods
From the host:
1 kubectl -n kube-system get service kubernetes-dashboard
If the service is ClusterIP, convert it to NodePort:
1 kubectl -n kube-system edit service kubernetes-dashboard
2 # Change:
3 # type: ClusterIP
4 # To:
4 # type: NodePort
Then get the IP and port:
1 multipass exec microk8s-cp -- ip -f inet -4 -o addr # for the IP address of microk8s-cp
2 kubectl -n kube-system get service kubernetes-dashboard # for the port
Access the dashboard:
1 https://<microk8s-cp IP>:<NodePort>
To get the login token:
1 kubectl describe secret -n kube-system microk8s-dashboard-token
Conclusion
Setting up a multi-node Kubernetes cluster locally using MicroK8s and Multipass empowers AI developers to mimic production environments. Whether you're deploying AI models, orchestrating data pipelines, or just learning Kubernetes internals, this setup provides a solid foundation. While the instructions here are tailored for Ubuntu 24.04, they can be adapted for other Linux distributions with minor changes.
Ubuntu 24.04 is a Linux distribution developed and maintained by Canonical Ltd. All trademarks and copyrights are property of their respective owners.
Kubernetes is an open-source container orchestration platform originally developed by Google and now maintained by the Cloud Native Computing Foundation (CNCF).
Multipass and MicroK8s are open-source tools developed and maintained by Canonical Ltd., the publisher of Ubuntu. Multipass provides a fast, lightweight VM experience, while MicroK8s offers a minimal, production-ready Kubernetes distribution.
Building a Local AI Development Environment Using Kubernetes, Ollama, and Open WebUI
In today’s fast-paced AI development ecosystem, having a local setup that mirrors production environments is invaluable. This post guides AI software developers through setting up a multi-node Kubernetes cluster to run containerized AI applications locally using Ollama and Open WebUI. This environment allows developers to iterate rapidly on LLM applications before transitioning to the cloud—only when necessary.
This guide is tailored for Ubuntu 24.04, but can be adapted to other Linux distributions with appropriate package management changes.
Why This Setup?
By combining MicroK8s, Multipass, Ollama, and Open WebUI, you get a:
-
Scalable local Kubernetes environment (see blog How to Set Up a Multi-Node Kubernetes Cluster for AI Development Using MicroK8s and Multipass on Ubuntu 24.04)
-
Fully containerized LLM setup
-
Portable AI inference interface
-
Cloud-ready architecture
With Ollama handling LLM inference and Open WebUI as the frontend, this architecture offers a production-grade development sandbox.
Part 1: Install and Configure Ollama
Ollama is a lightweight runtime for running LLMs locally.
Install Ollama
1 sudo snap install ollama
Verify Installation
1 snap list | grep ollama
2 snap info ollama
Enable External Access
By default, Ollama binds to 127.0.0.1:11434. To allow access from other nodes:
1 sudo snap set ollama host=0.0.0.0
Verify:
1 sudo snap get ollama
Pull and Run an LLM
Ollama supports several models (see library). For example, to run llama3.2:
1 ollama run llama3.2
To clean up:
1 ollama rm llama3.2
Part 2: Deploy Open WebUI on Kubernetes
Open WebUI is the frontend interface to interact with the LLM running on Ollama.
You’ll define and deploy three Kubernetes resources:
-
Deployment – Describes the pod running Open WebUI
-
Service – Exposes the app via a load balancer
-
PersistentVolumeClaim – Ensures persistent storage
1. Deployment (deploy.yaml)
Create a file called deploy.yaml:
1 apiVersion: apps/v1
2 kind: Deployment
3 metadata:
4 name: open-webui
5 spec:
6 replicas: 1
7 selector:
8 matchLabels:
9 app: open-webui
10 template:
11 metadata:
12 labels:
13 app: open-webui
14 spec:
15 containers:
16 - name: open-webui-container
17 image: ghcr.io/open-webui/open-webui:main
18 ports:
19 - containerPort: 8080
20 env:
21 - name: OLLAMA_BASE_URL
22 value: http://<HOST_IP>:11434
23 volumeMounts:
24 - name: open-webui-data
25 mountPath: /app/backend/data
26 volumes:
27 - name: open-webui-data
28 persistentVolumeClaim:
29 claimName: open-webui-pvc
Replace <HOST_IP> with the host machine's IP address that runs Ollama.
2. Service (service.yaml)
1 apiVersion: v1
2 kind: Service
3 metadata:
4 name: open-webui-service
5 spec:
6 selector:
7 app: open-webui
8 ports:
9 - protocol: TCP
10 port: 3000
11 targetPort: 8080
12 type: LoadBalancer
3. Persistent Volume (volume.yaml)
1 apiVersion: v1
2 kind: PersistentVolumeClaim
3 metadata:
4 name: open-webui-pvc
5 spec:
6 accessModes:
7 - ReadWriteOnce
8 resources:
9 requests:
10 storage: 1Gi
This ensures data like chat history and settings persist across pod restarts.
Part 3: Deploy the Application
Run the following commands to apply all configurations:
1 kubectl create -f volume.yaml
2 kubectl create -f deploy.yaml
3 kubectl create -f service.yaml
Part 4: Verify the Deployment
Check the status of your deployment and services:
1 kubectl get deployment
2 kubectl get pods
3 kubectl get service open-webui-service
Note the EXTERNAL-IP and PORT of the service.
Part 5: Access Open WebUI
You have two options for accessing the UI:
Option A: Using External Load Balancer IP
Visit:
1 http://<EXTERNAL-IP>:<PORT>
(Use the values from the service description.)
Option B: Using Port Forwarding
Run:
1 kubectl port-forward --address 0.0.0.0 services/open-webui-service 9000:3000
Then access it remotely via:
1 http://<HOST_IP>:9000
Conclusion
This local Kubernetes setup provides a powerful sandbox for AI development:
-
Run LLMs using Ollama locally
-
Deploy production-like workloads on Kubernetes
-
Test your apps with Open WebUI before cloud migration
By mirroring real-world environments, you can accelerate development, testing, and experimentation—right from your laptop.
Kubernetes is an open-source container orchestration platform originally developed by Google and now maintained by the Cloud Native Computing Foundation (CNCF)
Ollama is a platform for running large language models locally, developed and maintained by Ollama, Inc. All trademarks and content are the property of their respective owners.
Open WebUI is an open-source web interface for local LLMs, developed and maintained by the Open WebUI community. All trademarks and content are the property of their respective owners.
Simplifying AI Development: Create Custom Conda Environments with a Single Script
Setting up the right environment is one of the most frustrating challenges AI developers face—especially when juggling various Python versions, CUDA Toolkit releases, and deep learning frameworks like PyTorch or TensorFlow. One wrong version mismatch can send you into dependency hell.
To tackle this, we’ve created an interactive script that streamlines the process of building custom Conda environments. Whether you’re a beginner or a seasoned AI engineer, this tool helps you get started fast, reliably, and without the guesswork.
Prerequisites
Before you run the script, make sure the following are installed:
✅ Miniconda or Anaconda
This is the package manager that will handle your Python and library installations.
✅ dialog (for interactive UI)
This enables the text-based interface in the terminal.
Install it on Ubuntu using:
1 sudo apt install dialog
Note: If you're on a different Linux distro, install dialog using your package manager (e.g., yum install dialog or pacman -S dialog).
Getting Started
1. Download the Script
Download the cuda_installer.sh script and place it in your working directory.
1 wget https://github.com/razerofficial/cuda-installer/raw/refs/heads/main/cuda_installer.sh
For details and supported versions, visit the GitHub repo.
2. Run the Script
Launch it with:
1 chmod +x cuda_installer.sh
2 ./cuda_installer.sh
Troubleshooting UI issues?
If the dialog box is cut off or not displaying properly, try maximizing your terminal window and running the script again.
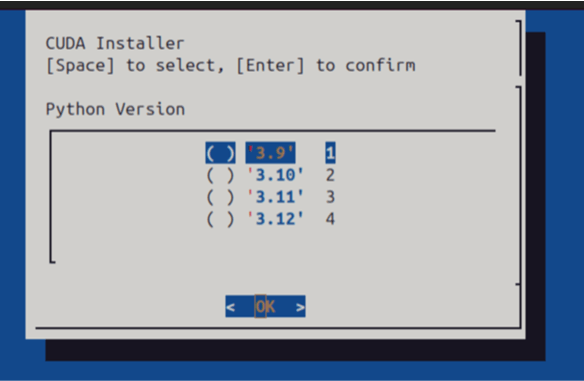
Interactive Environment Configuration
Once the script starts, you’ll be guided through a simple menu interface:
You’ll Select:
-
Python version (e.g., 3.8, 3.10)
-
CUDA Toolkit version (e.g., 11.8, 12.1)
-
Optional framework:
-
PyTorch
-
TensorFlow
-
Neither
-
Use the arrow keys and [Space] to select options, then [Enter] to confirm.
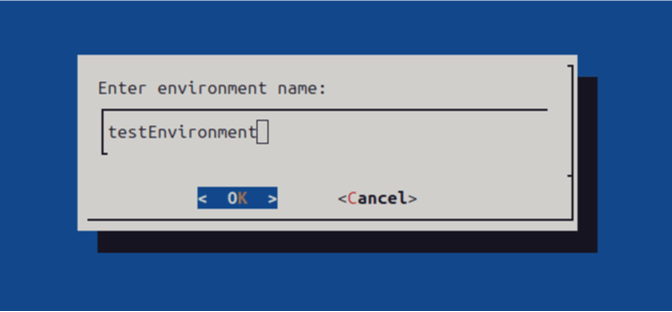
You’ll be prompted to name your new Conda environment.

✅ Activate Your Environment
Once setup is complete, you’ll see a success message like:
1 Installation successful! To activate your environment, run:
2 conda activate testEnvironment
Replace testEnvironment with the name you chose during setup.
You now have a clean, custom-built Conda environment tailored to your project’s needs—no manual installations or version conflicts.
Why This Tool Matters
This script is built with AI developers in mind—whether you’re just starting out or juggling multiple research experiments.
It’s especially useful for:
-
New AI developers who want a foolproof setup process
-
Educators and instructors teaching AI and ML courses
-
Teams who need reproducible environments across machines
-
Researchers working on different projects with incompatible dependencies
Whether you need PyTorch with CUDA 12.1 or a legacy TensorFlow 2.x with Python 3.8, this tool helps you stay productive and avoid environment chaos.
Miniconda is a minimal Conda installer provided by Anaconda, Inc. All trademarks and copyrights are the property of their respective owners.
The CUDA® Toolkit is developed and maintained by NVIDIA Corporation. CUDA and NVIDIA are trademarks or registered trademarks of NVIDIA Corporation in the U.S. and other countries.
PyTorch is an open-source machine learning framework originally developed by Meta AI. It is now governed by the PyTorch Foundation, a project of the Linux Foundation.
TensorFlow is an open-source machine learning framework developed and maintained by Google, originally created by the Google Brain team.

