
Follow the instructions for your Razer gaming chair model to properly disassemble it for storage or transport.
Select your chair model below to view the tools needed and disassembly steps.
Disassembly instructions by chair model
Razer Enki
Prevent damages to your Razer Enki while being stored or transported by following proper disassembly instructions.
Tools needed:
- Rubber mallet
- Hex key “M”
- Microfiber cloth
- Penetrating lubricant
- Penknife
Important: Put the chair over a smooth work surface to protect it from scratch and any other types of damage during the process.
-
Remove the head cushion “D”.

-
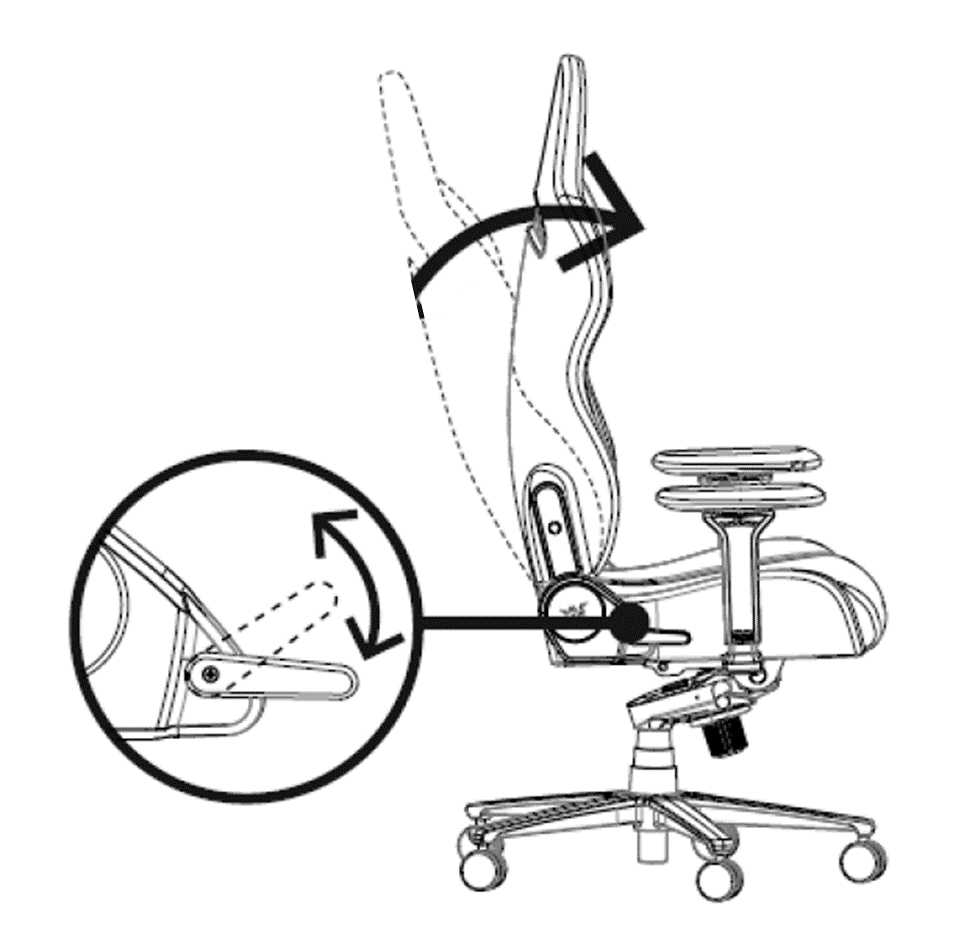
Straighten the backrest “A”.
-
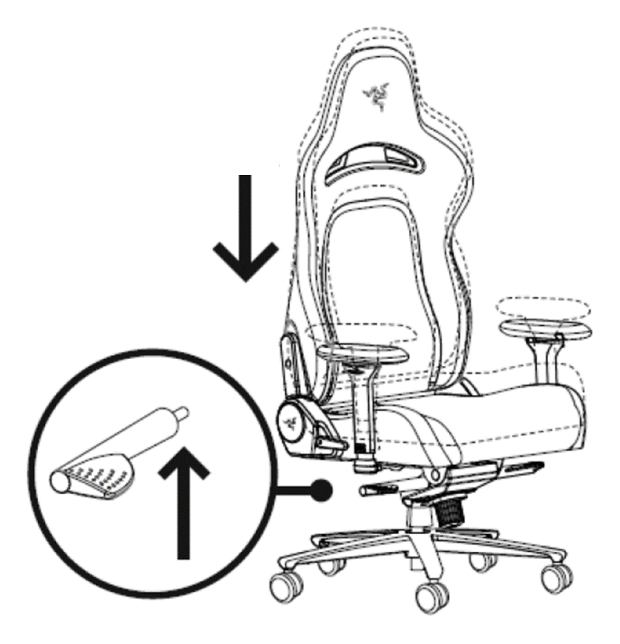
Align both armrests straight.

-
Adjust both armrests height to lowest.

-
Set the chair to its lowest height.
-
Turn the chair upside down.
-
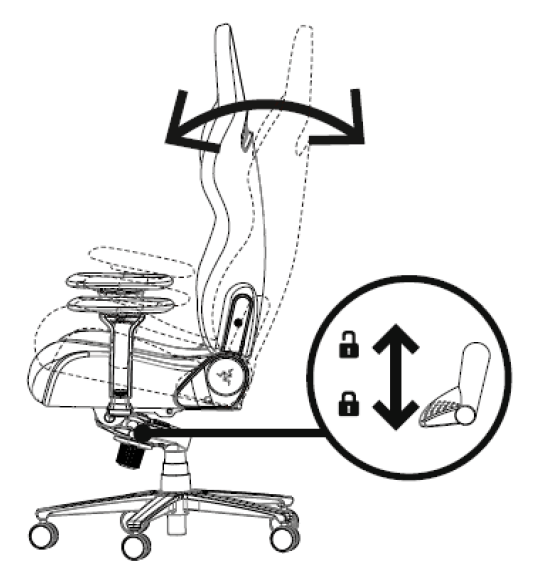
Unlock the tilt mechanism.
-
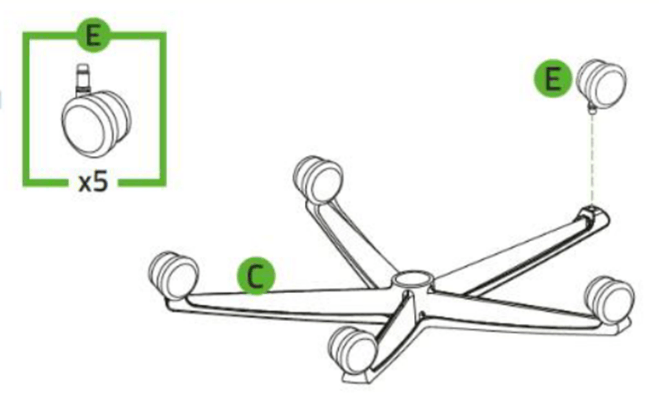
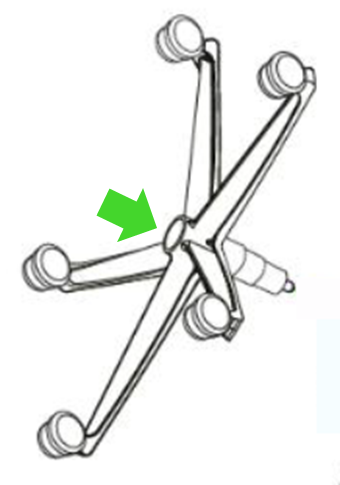
Grab the base “C” then pull out the caster wheels “E”.
-
Apply some penetrating lubricant between the wheel and wheelbase if the caster wheels “E” are difficult to pull out. Leave it for five minutes before trying again.
-
Apply some penetrating lubricant between the gas lift cylinder “I” and wheelbase “C”. Leave it for five minutes.
-
Dislodge the wheelbase “C” by pulling it while hitting the cylinder “I” with the rubber mallet wrapped in a microfiber cloth. Make sure you hit only the outer rim of the gas lift cylinder and avoid using too much force when hammering.
-
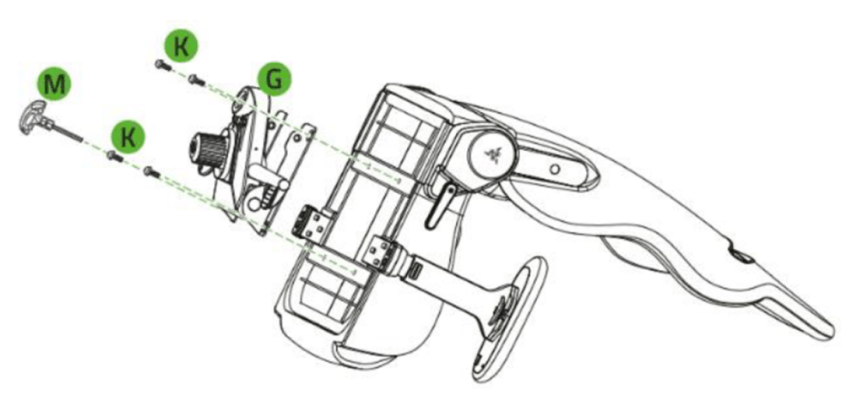
Unfasten the screws “J” using the hex key “M” to detach the tilt mechanism “G”.
-
Apply some penetrating lubricant between the gas lift cylinder “I” and tilt mechanism “G”. Leave it for five minutes.
-
Grip the gas lift cylinder “I” firmly and hit the tilt mechanism “G” with the rubber mallet wrapped in a microfiber cloth to separate.
-
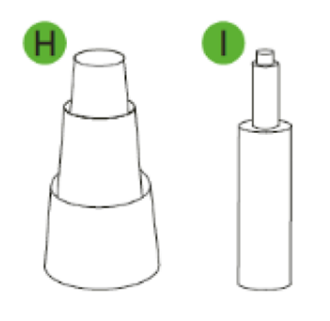
Separate the cylinder cover “H” from the cylinder “I”.
-
Turn the chair right-side up.
-
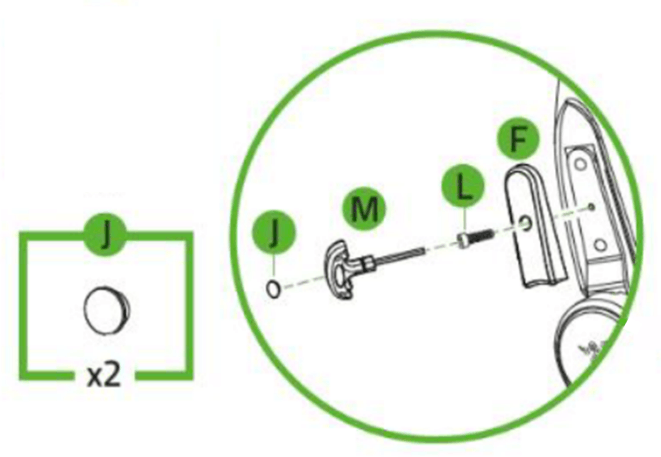
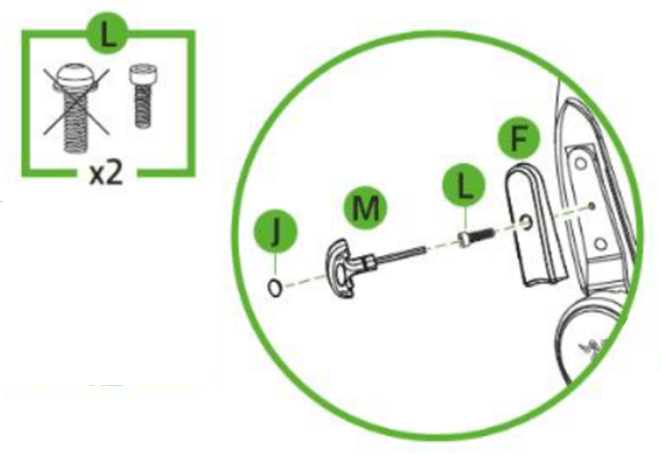
Remove the plastic screw caps “J” using a penknife.
-
Unfasten the screws “L” to remove the side covers “F”.
-
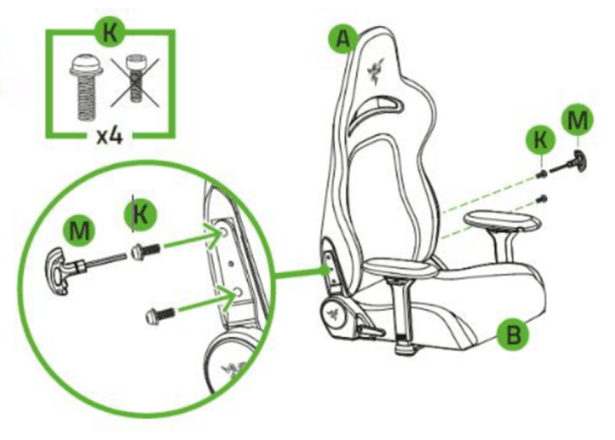
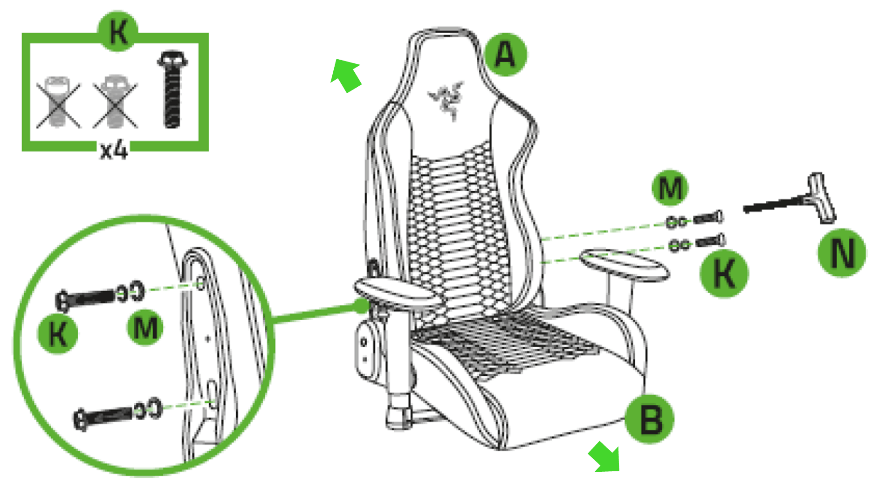
Unfasten the screws “K” on the support brackets to detach the backrest “A” from the seat “B”.
Razer Enki Pro
Properly disassemble your Razer Enki Pro to prevent damages while being stored or transported.
Tools needed:
-
Rubber mallet
-
Hex key “L”
-
Microfiber cloth
-
Penetrating lubricant
Step-by-step process on how to disassemble the Razer Enki Pro
Note: Put the chair over a smooth work surface to protect it from scratches and other types of damage during the process.
-
Detach the head cushion “D” from the backrest.

-
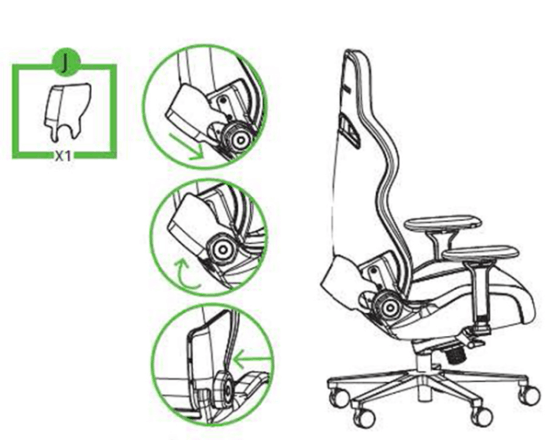
Detach the side cover “J”.
-
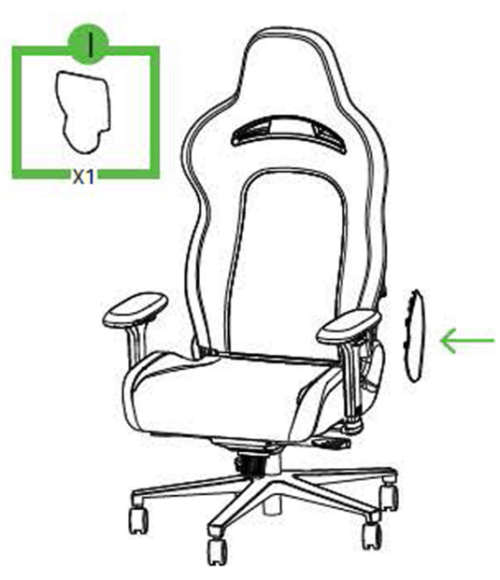
Detach the side cover “I”.
-
Unfasten the screws “K” from the support brackets using the hex key “L”.

-
Detach backrest “A” from seat “B”.
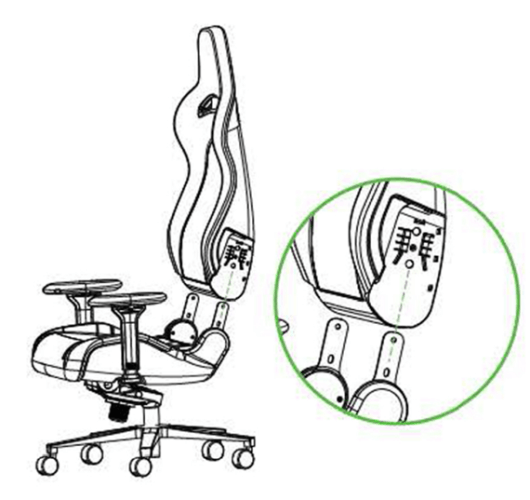
-
Fasten the screws “K” into the backrest “A”.
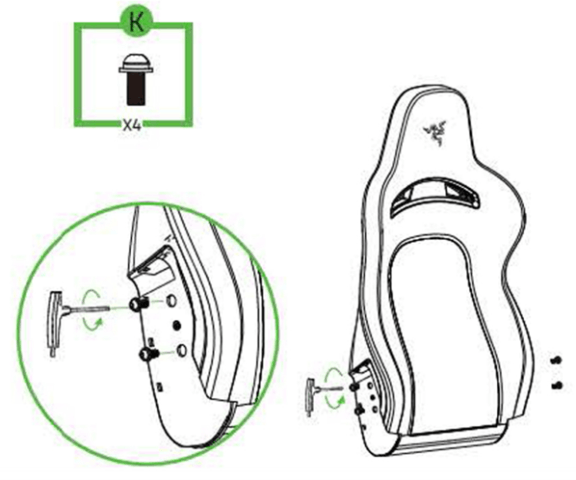
-
Turn the seat and wheel assembly upside down.
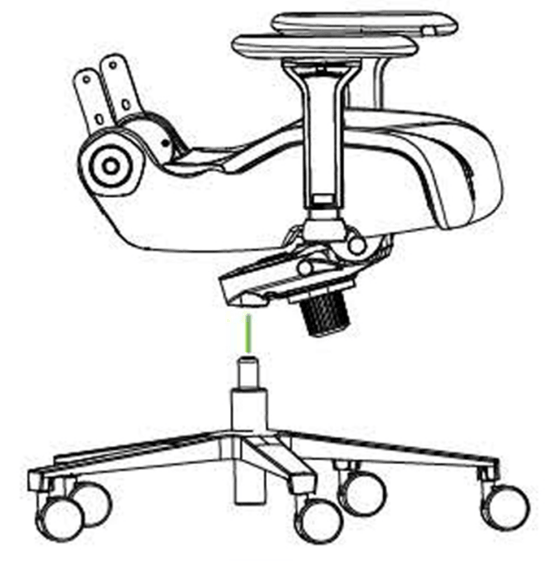
-
Grab the base “C” then pull out the caster wheels “E”.
Note: Apply penetrating lubricant between the wheel and wheelbase if the caster wheels “E” are difficult to pull out.
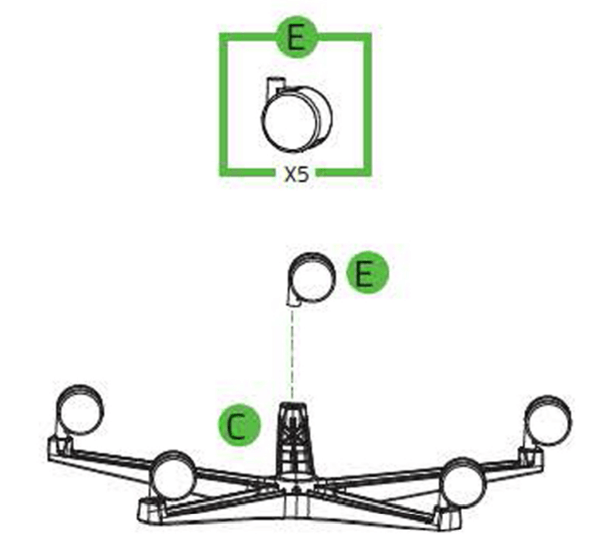
-
Apply penetrating lubricant between the gas lift cylinder “H” and wheelbase “C”. Leave it for five minutes.
-
Dislodge the wheelbase “C” by pulling it while hitting the cylinder “H” with the rubber mallet wrapped in a microfiber cloth.
Important: Make sure you only hit the outer rim of the gas lift cylinder and avoid using too much force when hammering.
-
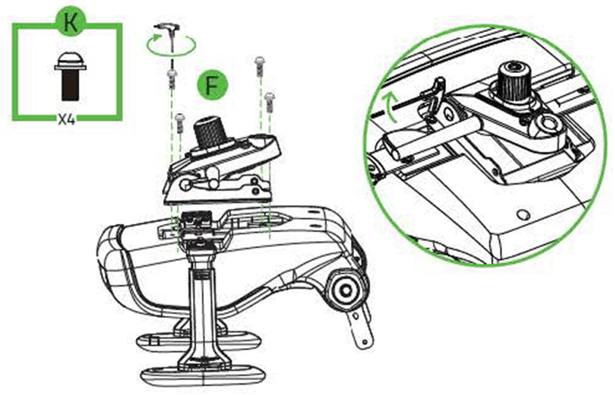
Unfasten the screws “K” off the tilt mechanism “F” to detach it from mounting bracket.
-
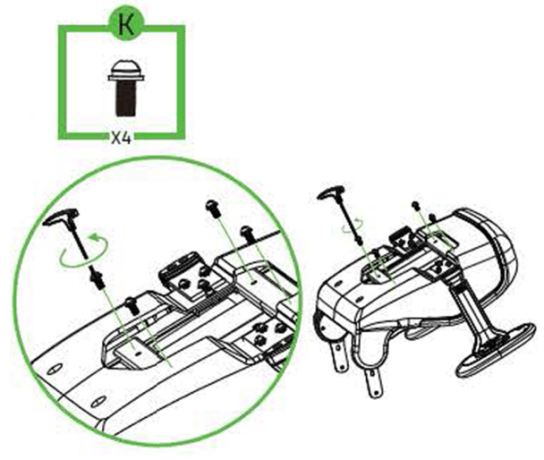
Fasten the screws “K” on the tilt mechanism mounting bracket.
-
Apply penetrating lubricant between the gas cylinder “H” and tilt mechanism “F”. Leave it for five minutes.
-
Grip the gas lift cylinder “H” firmly and hit the tilt mechanism “F” with the rubber mallet wrapped in a microfiber cloth to separate.
-
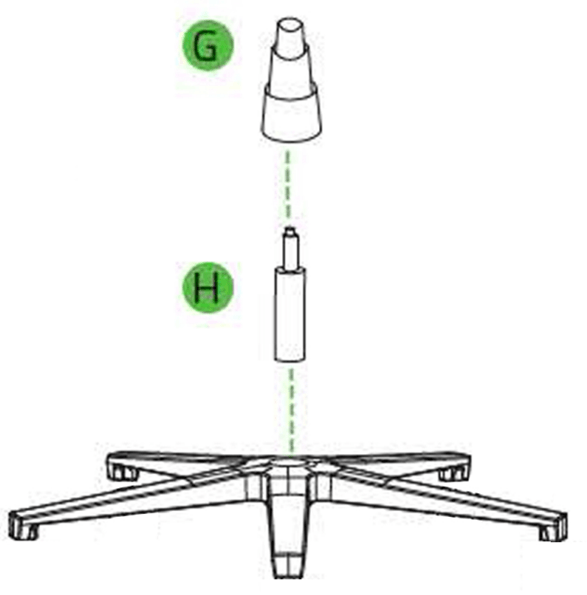
Separate the cylinder cover “G” from the cylinder “H”.
-
Put all the disassembled parts inside the box accordingly.
Razer Fujin
Properly disassemble your Razer Fujin to prevent damage while being stored or transported.
Tools needed:
-
Rubber mallet
-
Hex key “L”
-
Microfiber cloth
-
Penetrating lubricant
Step-by-step process on how to disassemble the Razer Fujin
Important: Put the chair over a smooth work surface to protect it from scratch and any other types of damage during the process.
-
Remove the piston and star base from the seat.

-
Unfasten the screws from the seat base using the hex key.

-
Detach the backrest.

-
Fasten the screws into the backrest.

-
Remove the chair mechanisms from the seat base.

-
Unfasten the screws that connect the armrest and the seat base, and detach the armrests from it.

-
Separate the cylinder cover from the cylinder.
-
Apply penetrating lubricant between the gas lift cylinder and wheelbase. Leave it for five minutes.
-
Dislodge the wheelbase by pulling it while hitting the cylinder with the rubber mallet wrapped in a microfiber cloth.

Important: Make sure you hit only the outer rim of the gas lift cylinder and avoid using too much force when hammering.
-
Grab the base then pull out the caster wheels.
Note: Apply some penetrating lubricant between the wheel and wheelbase if the caster wheels are difficult to pull out.
-
Put all the disassembled parts inside the box accordingly.
Razer Iskur
Proper disassembly and packing of the Razer Iskur are as important as the proper assembly of the chair. It is to prevent damages while being stored or transported.
Tools needed:
- Rubber mallet
- Hex key “P”
- Microfiber cloth
- Penetrating lubricant
- Penknife
Below are the steps on how to disassemble the Razer Iskur:
Note: It is recommended to put the chair over a smooth work surface to protect it from scratch and any other types of damage during the process.
-
Remove the head cushion “D”.

-
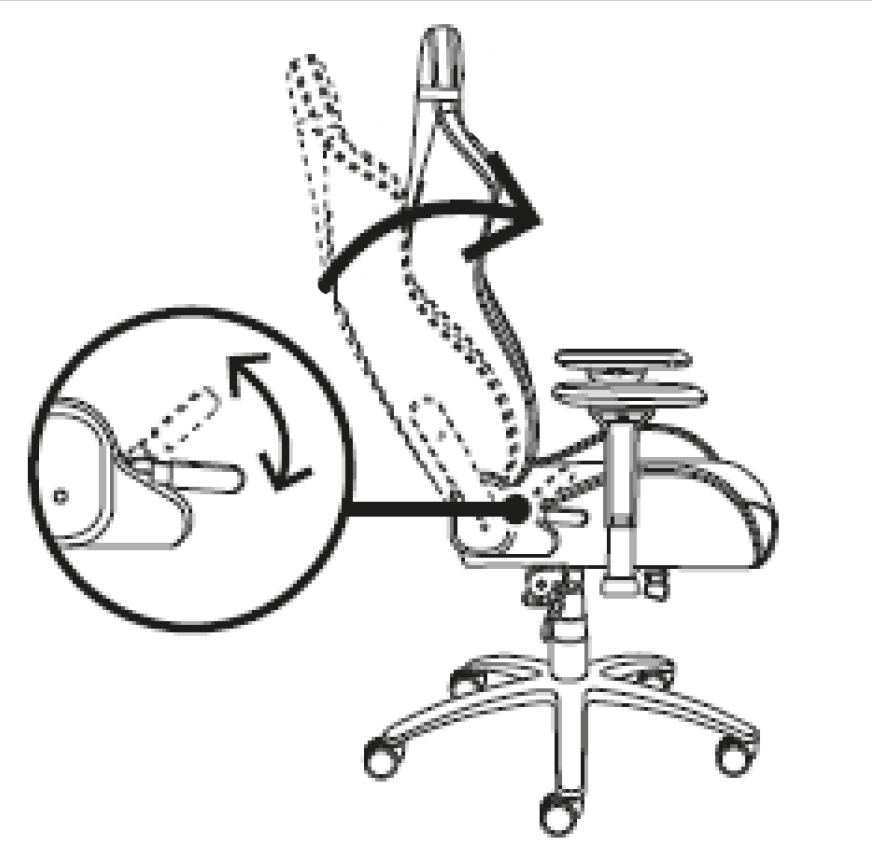
Straighten the backrest.
-
Flatten the lumbar support.

-
Align both armrests straight and adjust to the lowest height.

-
Set the chair to its lowest height.

-
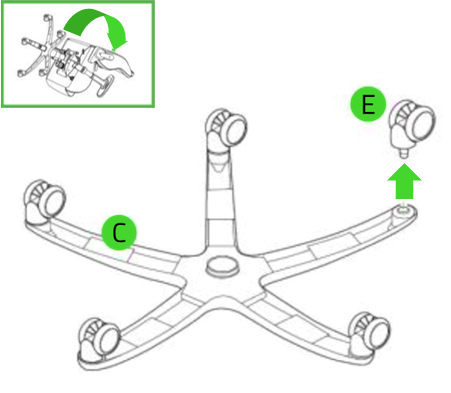
Turn the chair upside down. Grab the base “C” then pull out the caster wheels “E”. If the caster wheels “E” are difficult to pull out, you need to apply some penetrating lubricant between the wheel and wheelbase and leave it for five minutes before trying again.
-
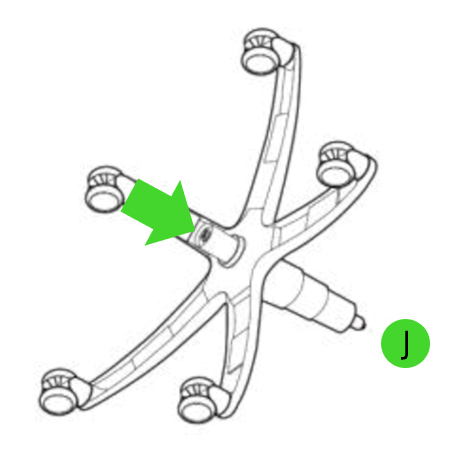
Apply some penetrating lubricant between the gas lift cylinder “J” and wheelbase “C” and leave it for five minutes.
-
Dislodge the cylinder “J” by hitting it with the rubber mallet wrapped in a microfiber cloth. Make sure you hit only the outer rim of the gas lift cylinder and avoid using too much force when hammering.
-
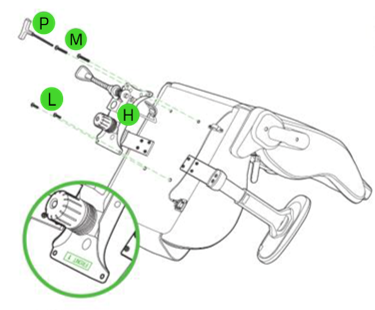
Detach the tilt mechanism “H” by unfastening the screws “M” and “L” using the hex key “P”.
-
Apply some penetrating lubricant between the gas lift cylinder “J” and tilt mechanism “H” and leave it for five minutes.
-
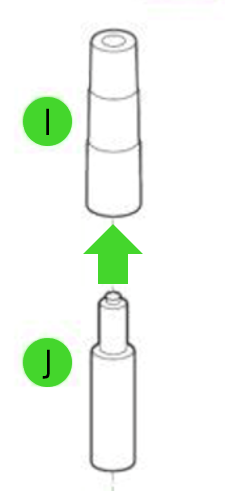
Remove the gas lift cylinder “J” from the tilt mechanism “H” by gripping it firmly and hitting the tilt mechanism “H” with the rubber mallet wrapped in a microfiber cloth. Then, separate the cylinder cover “I” from the cylinder “J”.
-
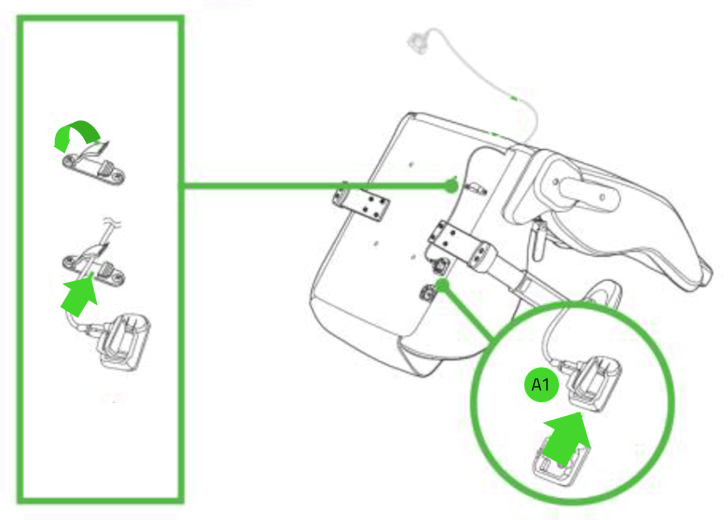
Slide out the lumbar support lever “A1” from the holder then unclip to release the cord.
-
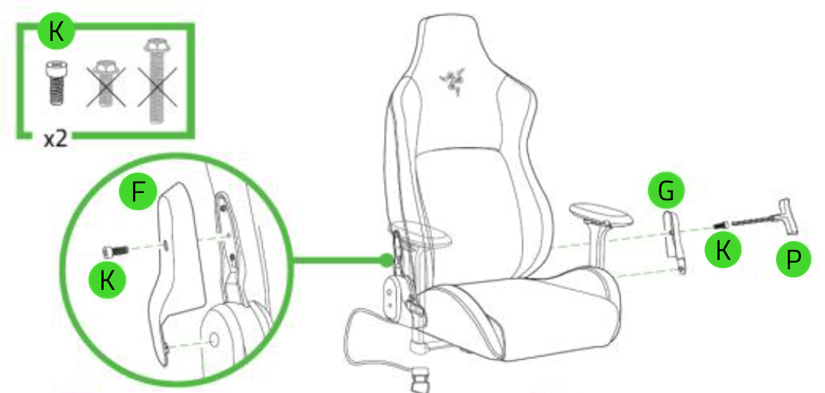
Remove the plastic screw caps “O” and “N” using a penknife.

-
Unfasten the screws “K” to remove the side covers “F” and “G”.
-
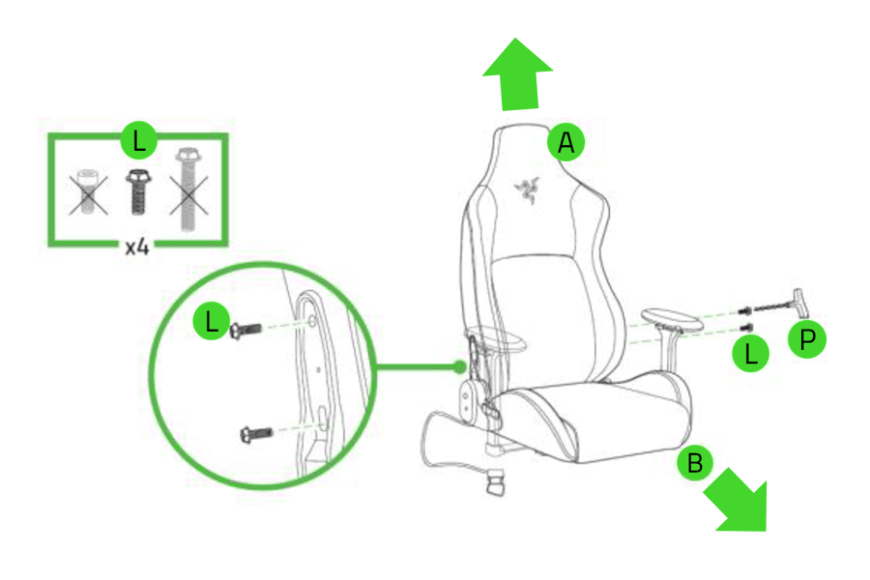
Unfasten the screws “L” on the support brackets to detach the backrest “A” from the seat “B”.
Razer Iskur V2 / Razer Iskur V2 NewGen
Applicable models:
Properly disassemble your Razer Iskur V2 to prevent damage while being stored or transported.
Tools needed:
-
Rubber mallet
-
Hex key “L”
-
Microfiber cloth
-
Penetrating lubricant
Step-by-step process on how to disassemble the Razer Iskur V2
Important: Put the chair over a smooth work surface to protect it from scratch and any other types of damage during the process.
-
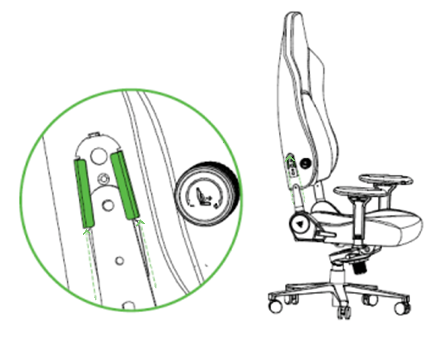
Unclasp the belt at the back of the headrest.

-
Remove the headrest from the backrest.

-
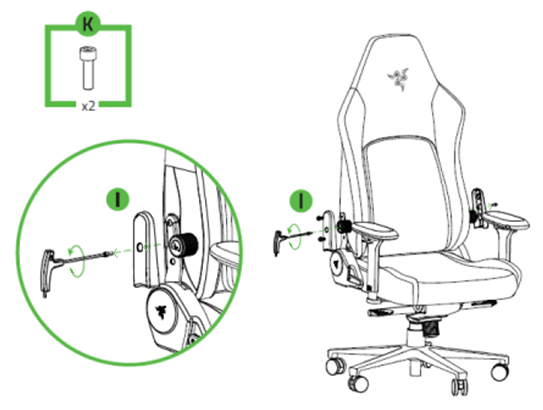
Remove the plastic screw caps “M” using a penknife.

-
Unfasten the screws “K” on the support brackets “I” using the hex key.
-
Unfasten the screws “L” that connect the backrest to the seat.

-
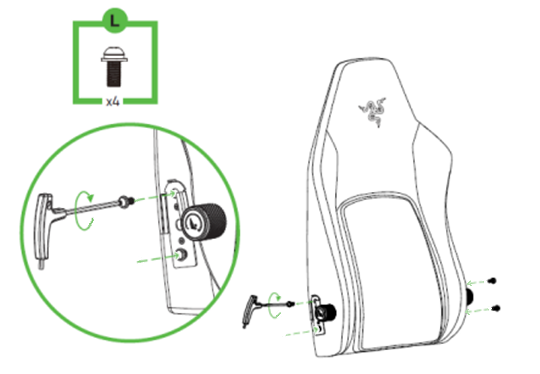
Detach the backrest from the seat.
-
Fasten the screws into the backrest.
-
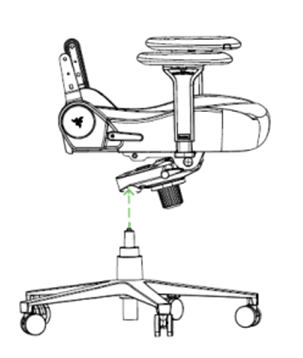
Remove the piston and starbase from the seat.
-
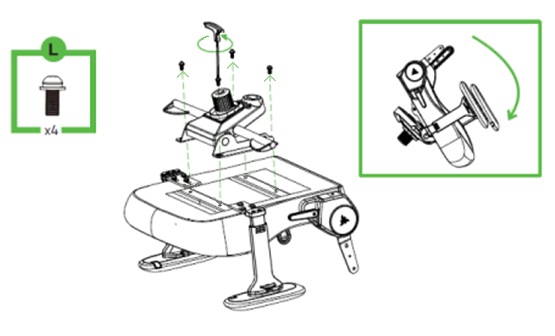
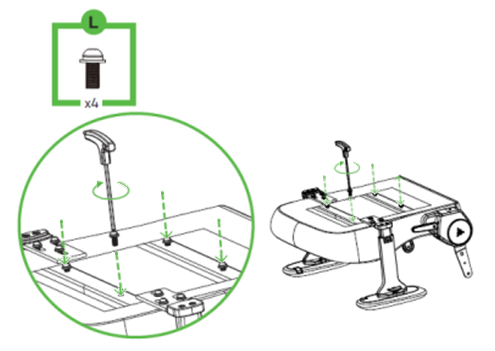
Unfasten the screws “L” using the hex key to detach the tilt mechanism.
-
Remove the tilt mechanism from the seat base.
-
Fasten the screws into the seat base.
-
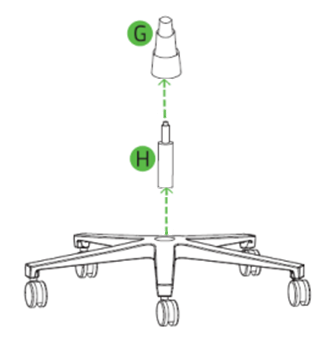
Apply some penetrating lubricant between the gas lift cylinder “H” and the tilt mechanism and leave it for five minutes.
-
Remove the gas lift cylinder “H” from the tilt mechanism by gripping it firmly and hitting the tilt mechanism with the rubber mallet wrapped in a microfiber cloth. Then, separate the cylinder cover “G” from the cylinder “H”.
-
Grab the base “C” then pull out the caster wheels “E”.
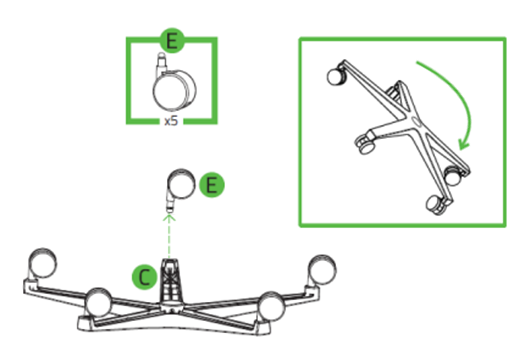
Note: Apply some penetrating lubricant between the wheel and wheelbase if the caster wheels are difficult to pull out.
-
Put all the disassembled parts inside the box accordingly.
Razer Iskur V2 X / Razer Iskur V2 X NewGen
Applicable models:
Properly disassemble your Razer Iskur V2 X to prevent damage while being stored or transported.
Tools needed:
-
Rubber mallet
-
Hex key
-
Microfiber cloth
-
Penetrating lubricant
-
Penknife
Step-by-step process on how to disassemble the Razer Iskur V2 X
Important: Put the chair over a smooth work surface to protect it from scratch and any other types of damage during the process.
-
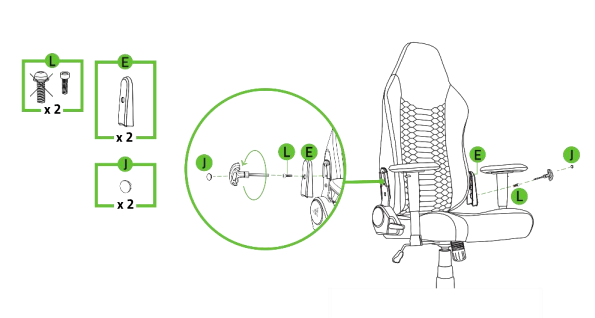
Remove the plastic screw caps “J” using a penknife, unfasten screws “L” and remove the cover “E”.
-
Unfasten the screws “K” using the hex key.
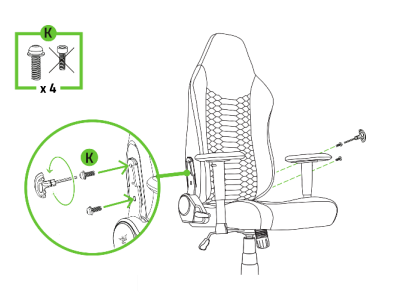
-
Detach the backrest from the seat.
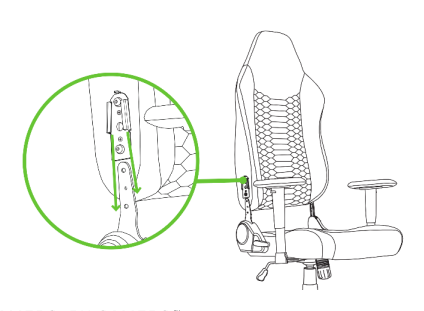
-
Fasten the screws into the backrest.
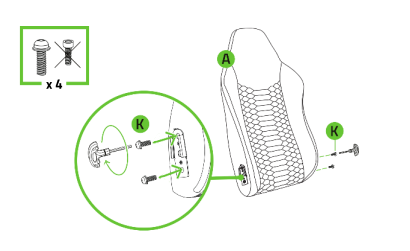
-
Remove the piston and starbase from the seat.
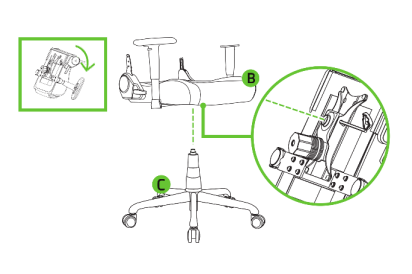
-
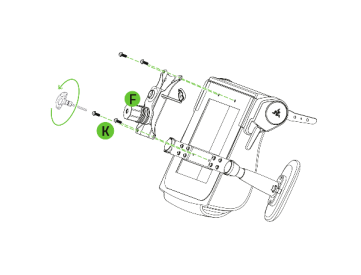
Unfasten screws “K” using the hex key to detach the tilt mechanism.
-
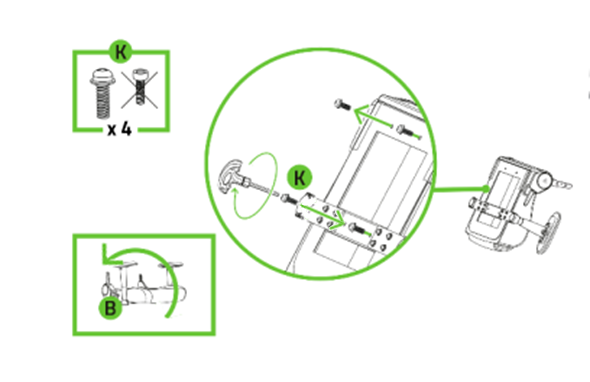
Remove the tilt mechanism from the seat base.
-
Fasten the screws “K” into the seatbase.
-
Apply some penetrating lubricant between the gas lift cylinder “H” and the tilt mechanism and leave it for five minutes.
-
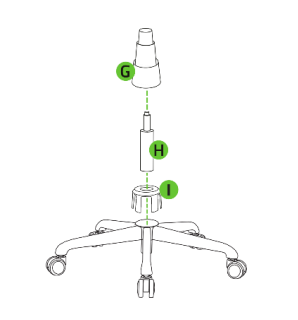
Remove the gas lift cylinder “H” from the tilt mechanism by gripping it firmly and hitting the tilt mechanism with the rubber mallet wrapped in a microfiber cloth. Then, separate the cylinder cover “G” from the cylinder “H”.
-
Grab the base “C” then pull out the caster wheels “D”.
Note: Apply some penetrating lubricant between the wheel and wheelbase if the caster wheels are difficult to pull out.
-
Put all the disassembled parts inside the box accordingly.
Razer Iskur X
Proper disassembly and packing of the Razer Iskur X are as important as the proper assembly of the chair. It is to prevent damages while being stored or transported.
Tools needed:
- Rubber mallet
- Hex key “N”
- Microfiber cloth
- Penetrating lubricant
- Penknife
You can view the video below for instructions.
Below are the steps on how to disassemble the Razer Iskur X:
Note: It is recommended to put the chair over a smooth work surface to protect it from scratch and any other types of damage during the process.
-
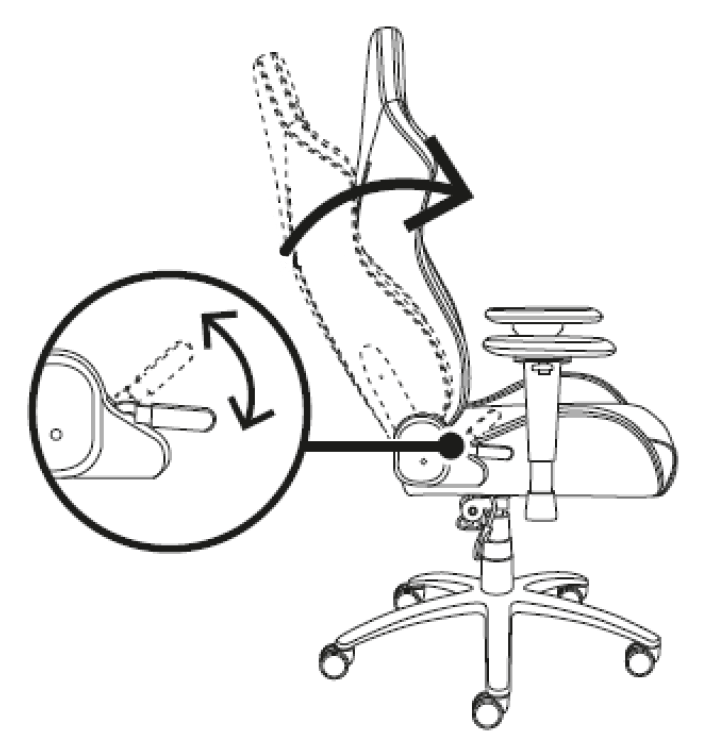
Straighten the backrest.
-
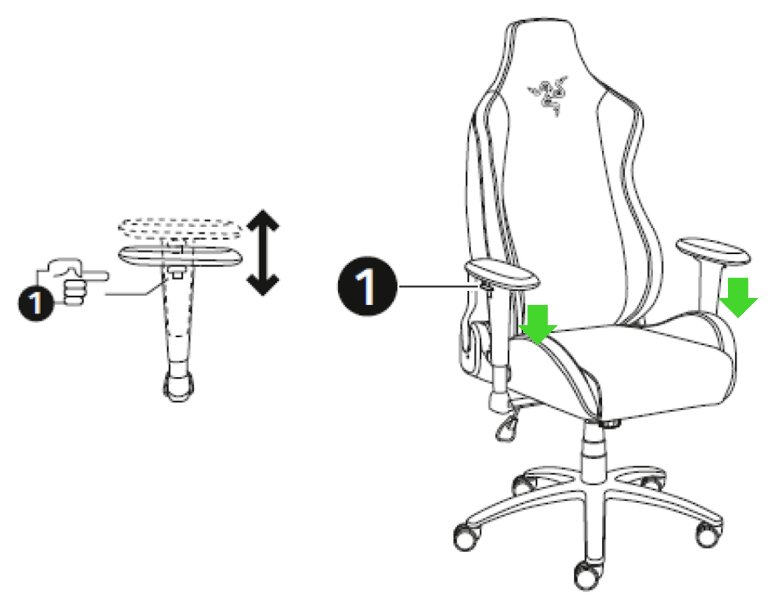
Align both armrests straight and adjust to the lowest height.
-
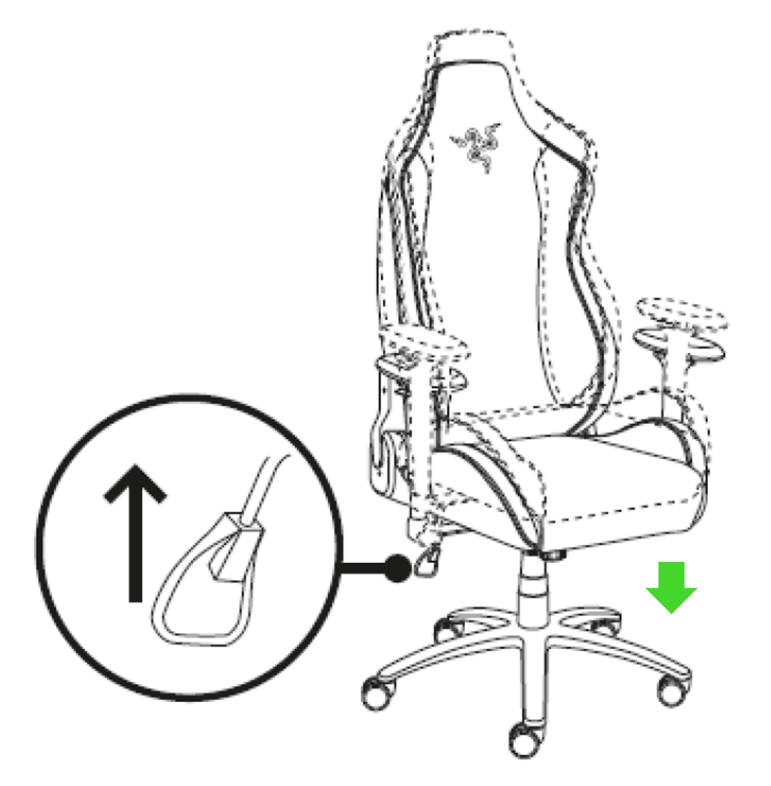
Set the chair to its lowest height.
-
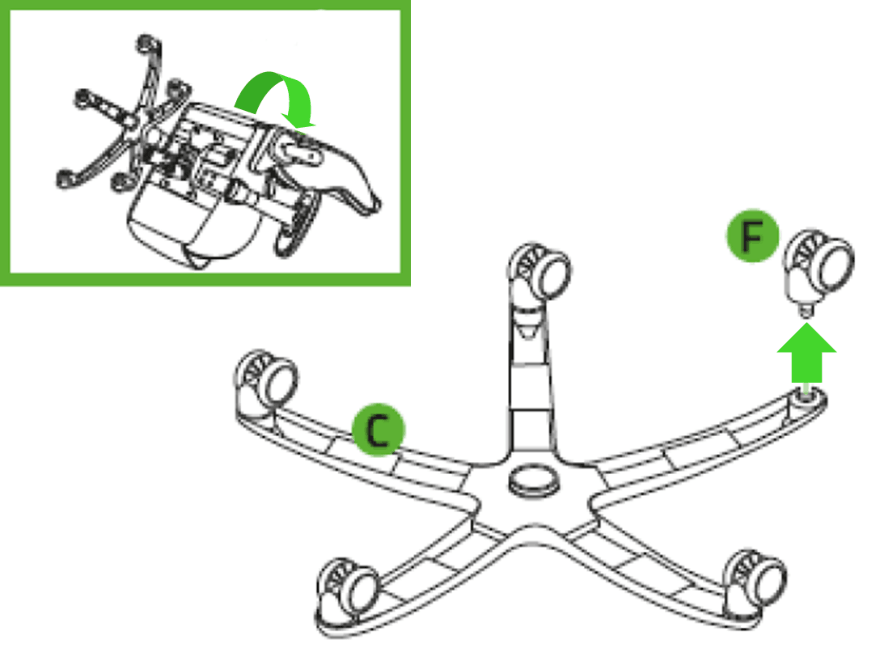
Turn the chair upside down. Grab the base “C” then pull out the caster wheels “F”. If the caster wheels “F” is difficult to pull out, you need to apply some penetrating lubricant between the wheel and wheelbase and leave it for five minutes before trying again.
-
Apply some penetrating lubricant between the gas lift cylinder “I” and wheelbase “C” and leave it for five minutes.
-
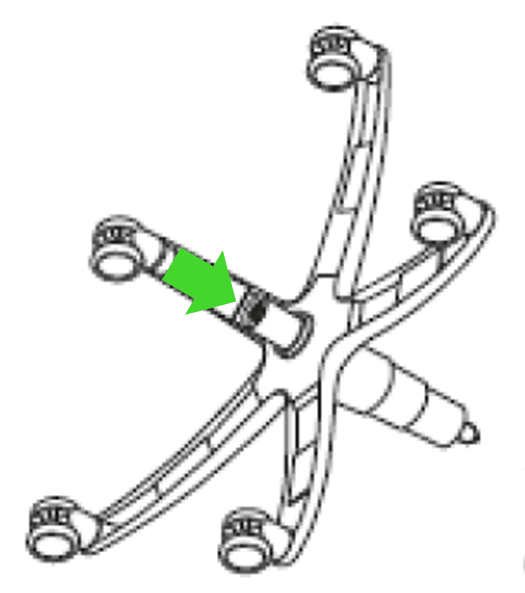
Dislodge the cylinder “I” by hitting it with the rubber mallet wrapped in a microfiber cloth. Make sure you hit only the outer rim of the gas lift cylinder and avoid using too much force when hammering.
-
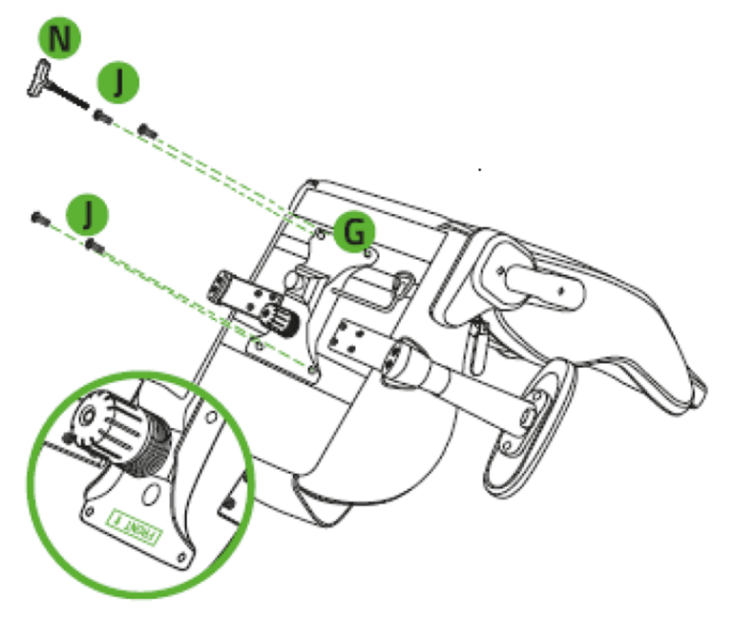
Detach the tilt mechanism “G” by unfastening the screws “J” using the hex key “N”.
-
Apply some penetrating lubricant between the gas lift cylinder “I” and tilt mechanism “G” and leave it for five minutes.
-
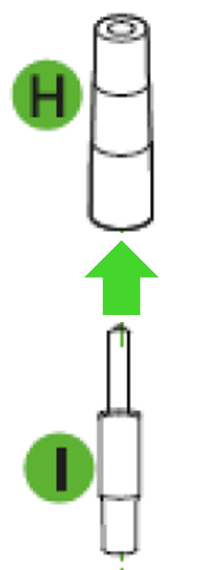
Remove the gas lift cylinder “I” from the tilt mechanism “G” by gripping it firmly and hitting the tilt mechanism “G” with the rubber mallet wrapped in a microfiber cloth. Then, separate the cylinder cover “H” from the cylinder “I”.
-
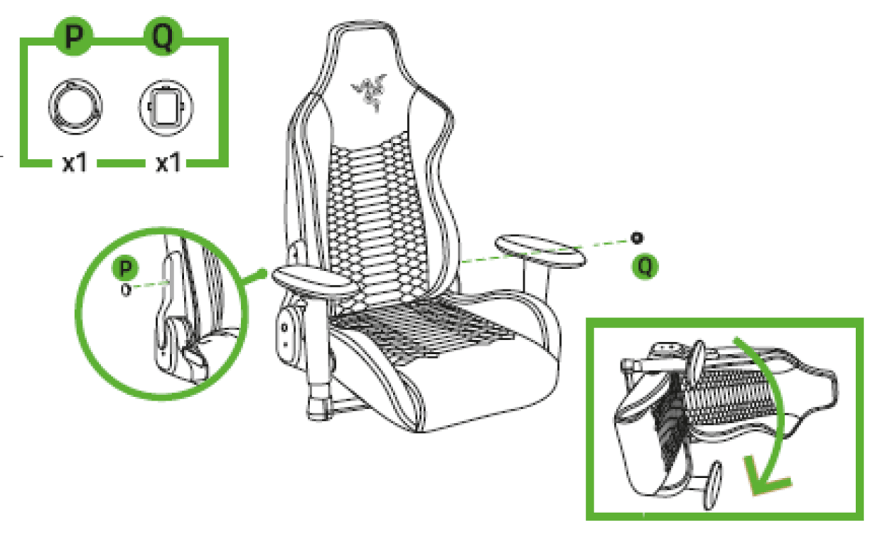
Remove the plastic screw caps “P” and “Q” using a penknife.
-
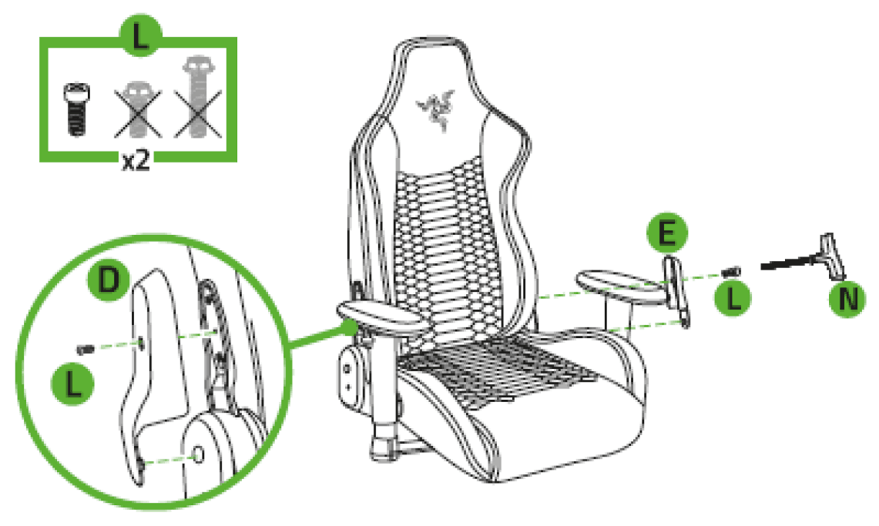
Unfasten the screws “L” to remove the side covers “D” and “E”.
-
Unfasten the screws “K” on the support brackets to detach the backrest “A” from the seat “B”.
Razer Soma Chroma
This article provides instructions on how to disassemble the Razer Soma Chroma.
Before you begin, make sure you do the following:
- Power off the chair.
- Disconnect it from the external power bank or USB Type C power adapter.
- Place the chair on a clean, flat surface.
- Use the provided EPE foam or other protective padding to prevent damage.
Note: Do not disassemble the backrest itself. Only remove the backrest from the seat base as instructed. Attempting to disassemble the backrest may void the warranty.
Follow the detailed instructions below to disassemble the Razer Soma Chroma gaming chair.
- Power off the chair.
- Disconnect the USB Type C power cable from the external power bank or USB Type C power adapter.
Note: Remove the external power bank from the designated pouch, if installed.
- Place the chair on a clean, flat surface.
- Remove the two side covers from the backrest mounting brackets.
- Using the T-handle hex key, loosen and remove the four screws securing the backrest mounting brackets to the seat base.
- Carefully lift the backrest away from the seat base and set it aside. Do not open or disassemble the backrest assembly.
- Lift the seat base straight up from the gas lift cylinder.
- Turn the seat base upside down and place it on the protective padding.
- Using the T-handle hex key, loosen and remove the four screws securing the tilt mechanism to the underside of the seat base.
- Remove the tilt mechanism from the seat base and set it aside.
- Remove the gas lift cylinder and cylinder cover from the wheel base.
- Remove the five caster wheels from the wheel base.
The Razer Soma Chroma disassembly process is now complete.

