You can view the video below for instructions or review a copy of the video transcript.
Select the mouse from the list below for specific instructions on how to pair or connect your wireless mouse to a system.
Connect via Bluetooth
Razer Basilisk V3 Pro 35K
-
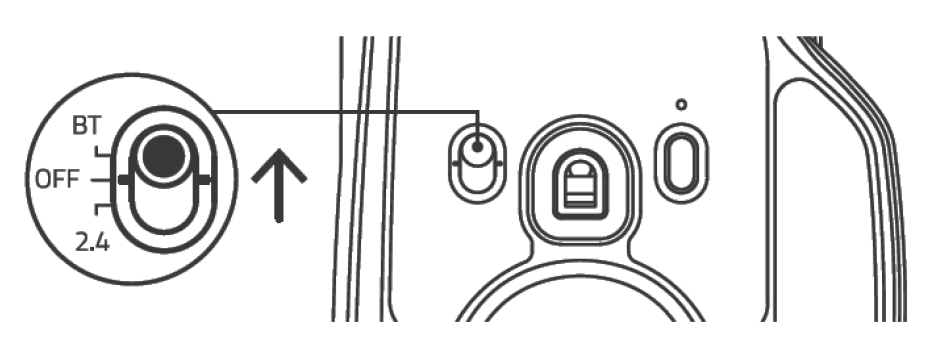
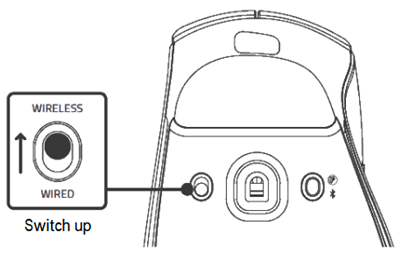
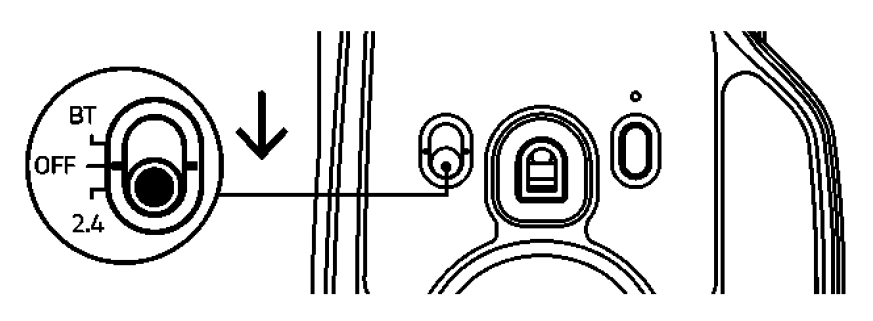
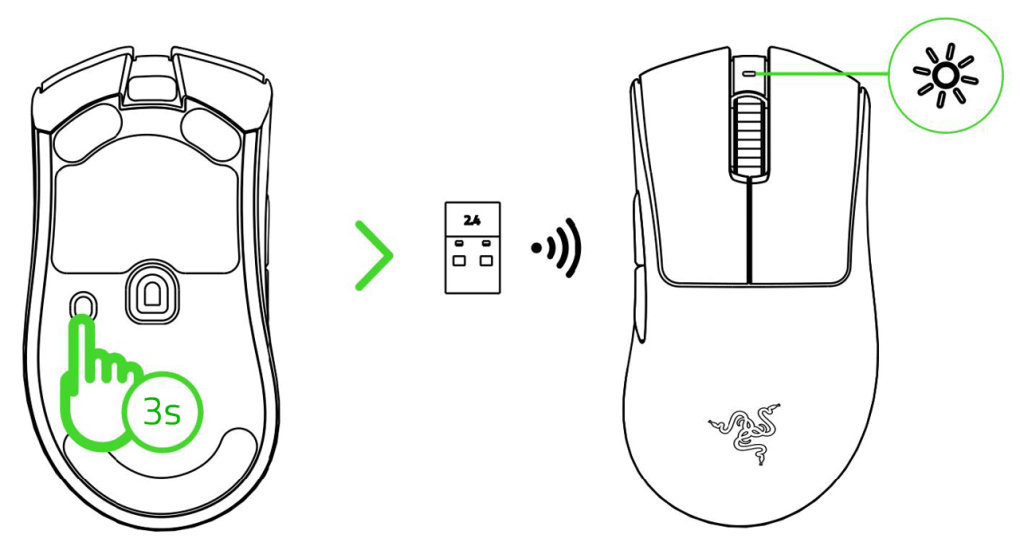
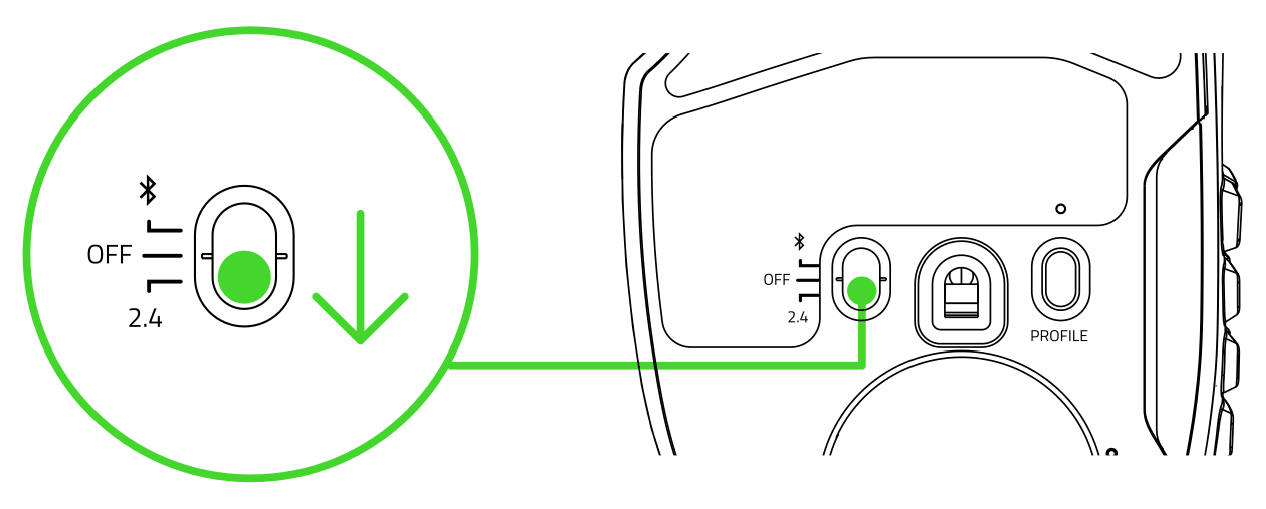
Push the slider switch to Bluetooth mode.
-
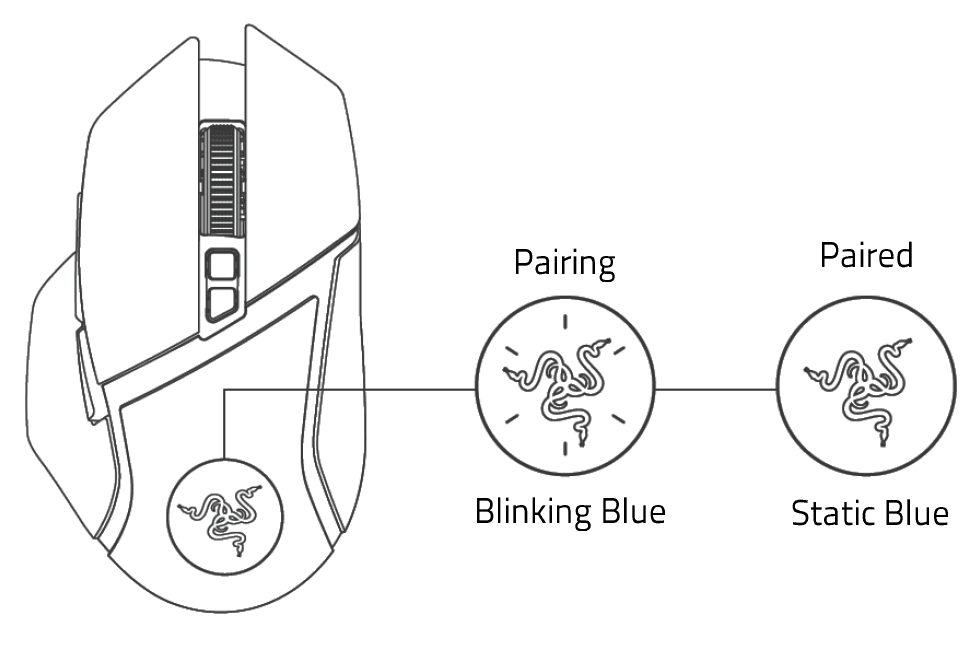
Press and hold the two side buttons and the scroll wheel simultaneously for three seconds to activate pairing mode.

-
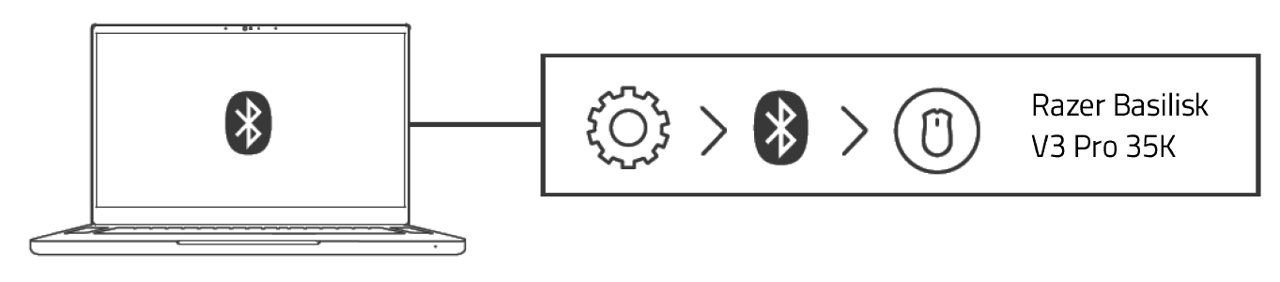
Activate Bluetooth on your device and select "Basilisk V3 Pro 35K" from the list of devices found.
-
Wait until the mouse pairs with your device. When paired, the Razer logo will briefly turn static blue.
Razer Basilisk V3 Pro
-
Push the slider switch to Bluetooth mode.

-
Press and hold the scroll wheel and the two side buttons simultaneously for three seconds to activate pairing mode. The scroll wheel and Razer logo will blink twice in repeated intervals to show that the device is in pairing mode.

-
Activate Bluetooth on your device and select "Razer Basilisk V3 Pro" from the list of devices found.

-
Wait until both devices are paired. The scroll wheel and the Razer logo will briefly turn static blue when paired.

Razer Basilisk X Hyperspeed
-
Switch the slider to Bluetooth mode.

-
Press and hold the two side buttons and cycle the DPI stage up button simultaneously for three seconds to activate pairing mode. The status indicator will blink twice in repeated intervals to show that the device is in pairing mode.

-
Activate Bluetooth on your device and search for "Razer Basilisk X Hyperspeed" from the list of devices found.

-
Wait until both devices are paired. When paired, the status indicator will change to static blue for two seconds before turning off.

Razer Basilisk V3 X HyperSpeed
-
Push the slider switch to Bluetooth mode.
-
Press and hold the two side buttons and the DPI cycle button simultaneously for three seconds to activate pairing mode. The scroll wheel will blink twice in repeated intervals to show that the mouse is in pairing mode.

-
Activate Bluetooth on your device and select "BSK V3 X HS" from the list of devices found.

-
Wait until the mouse pairs with your device. Then paired, the scroll wheel will briefly turn static blue.
Razer Cobra HyperSpeed
-
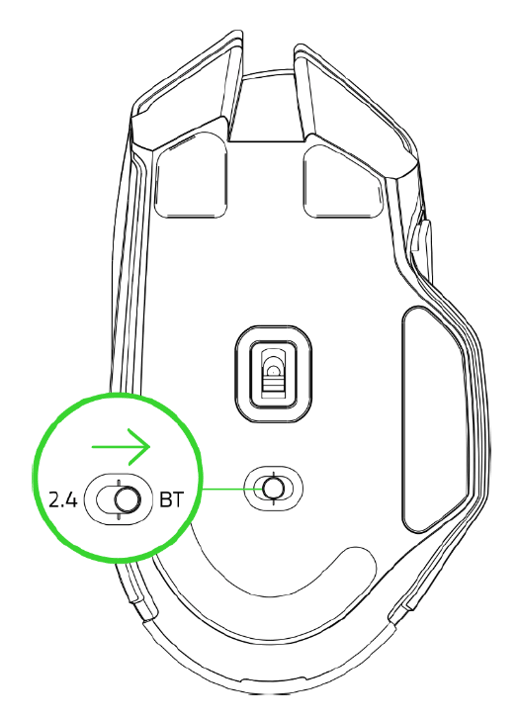
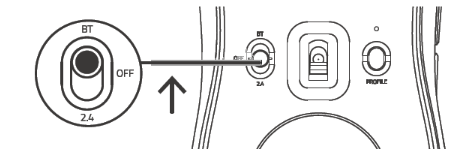
Push the slider switch to Bluetooth mode.
-
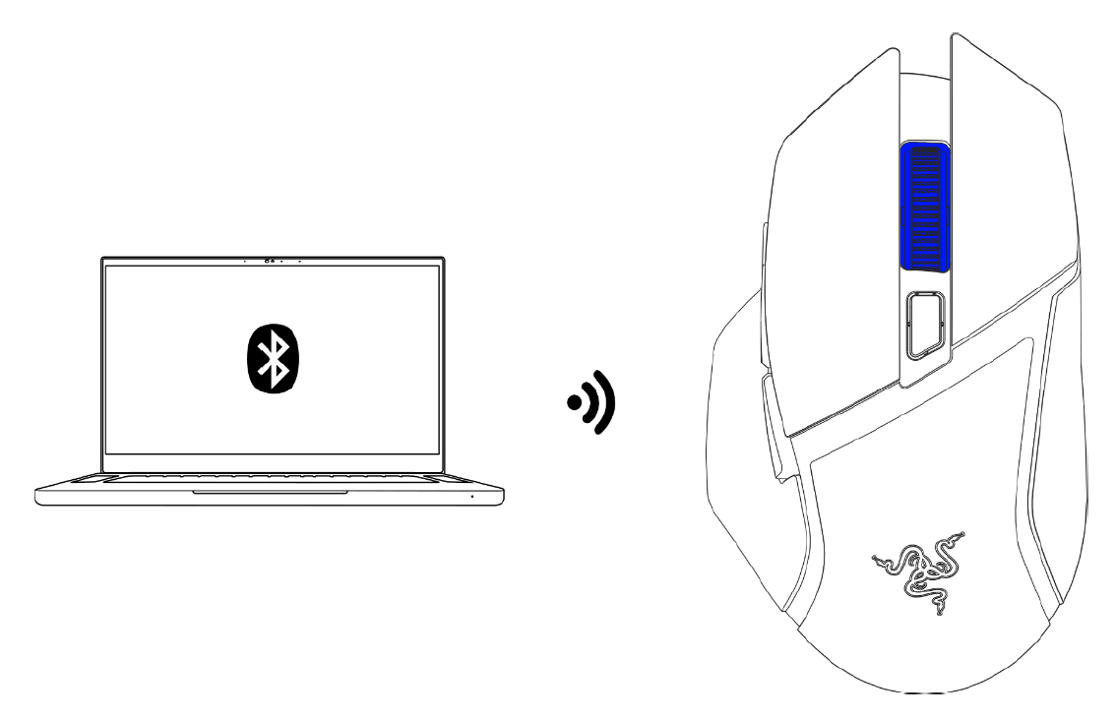
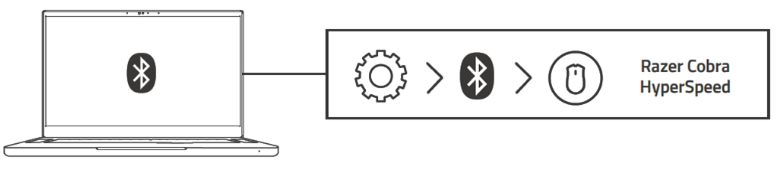
Activate Bluetooth on your device and select "Razer Cobra HyperSpeed" from the list of devices found.
-
Wait for the mouse to pair with your device. Once paired, the Razer logo will stop blinking and remain solid blue.
Razer Cobra Pro
-
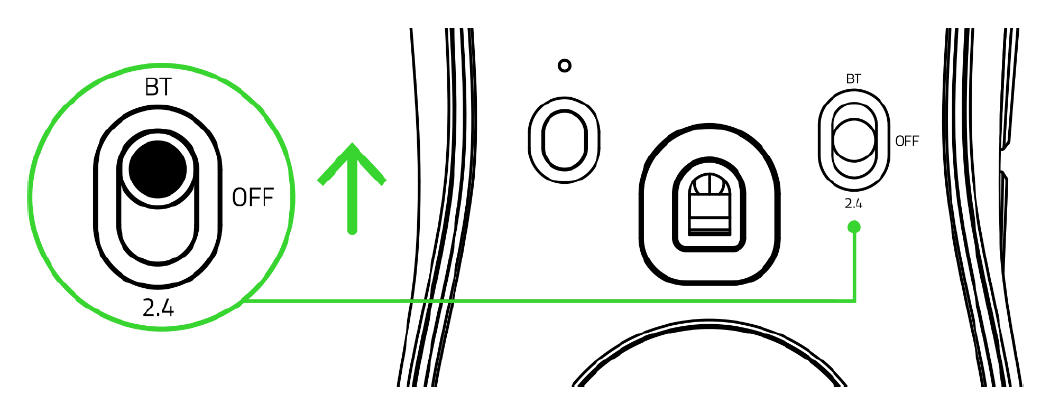
Push the slider switch to Bluetooth mode.
-
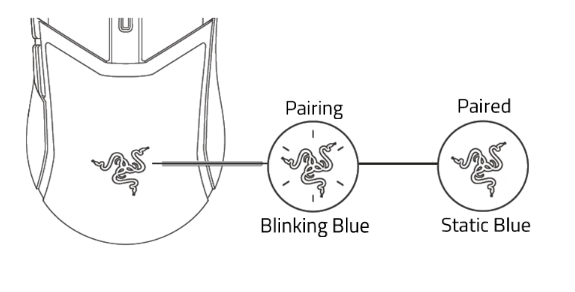
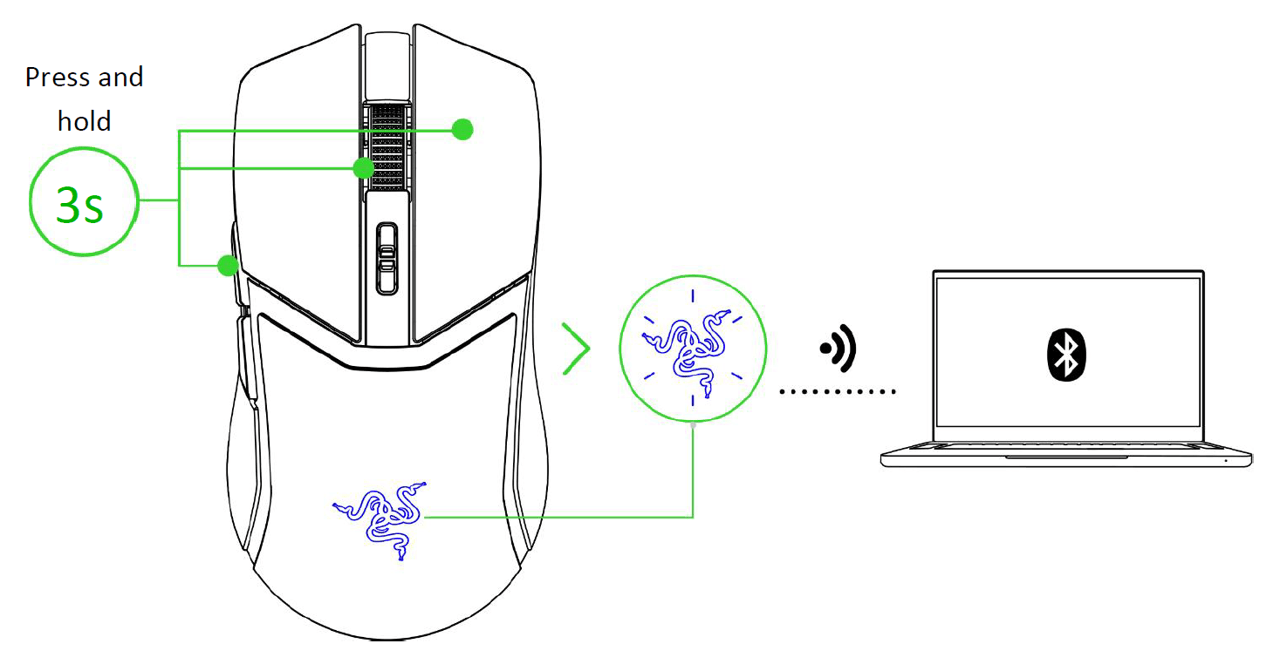
Press and hold the mouse button 5, the scroll wheel and the right mouse button simultaneously for three seconds to activate pairing mode. The Razer logo will blink twice in repeated intervals to show that the mouse is in pairing mode.
-
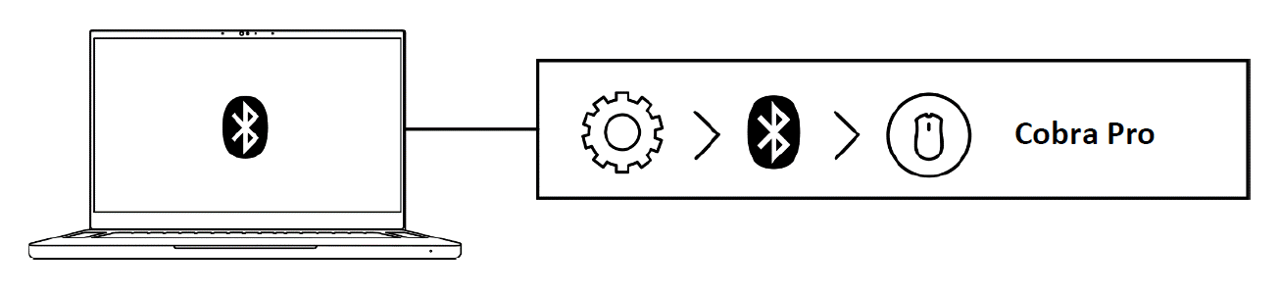
Activate Bluetooth on your device and select "Cobra Pro" from the list of devices found.
-
Wait until the mouse pairs with your device. When paired, the Razer logo will briefly turn static blue.

Razer DeathAdder V2 X HyperSpeed
-
Push the slider switch to Bluetooth mode.

-
Press and hold the two side buttons, the DPI stage up, and the DPI stage down buttons simultaneously for three seconds to activate pairing mode. The status indicator will blink twice in repeated intervals to show that the device is in pairing mode.

-
Activate Bluetooth on your device.
-
Search for new Bluetooth devices.
-
Select “DA V2 X” from the list of devices found.
-
Wait until the mouse pairs with your device. When paired, the status indicator will briefly turn static blue.

Razer DeathAdder V2 Pro
-
Push the slider switch to Bluetooth mode.

-
Press and hold the two side buttons and the DPI stage up button simultaneously for three seconds to activate pairing mode. The Razer logo will blink twice in repeated intervals to show that the device is in pairing mode.

-
Activate Bluetooth on your device, search for new Bluetooth devices, and select “Razer DeathAdder V2 Pro” from the list of devices found.
-
Wait until the mouse pairs with your device. When paired, the Razer logo will briefly turn static blue before displaying its current lighting effect.

Razer Naga V2 HyperSpeed
-
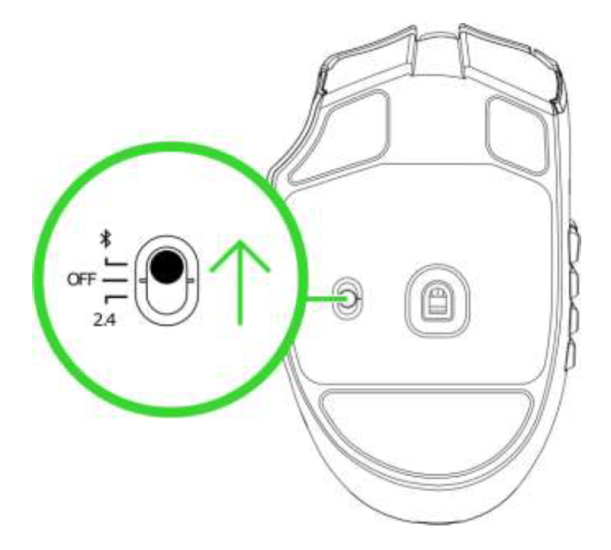
Push the slider switch to Bluetooth mode.
-
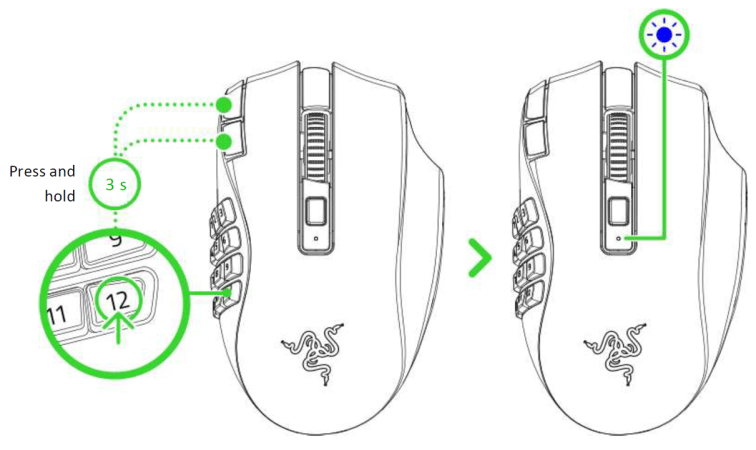
Press and hold button 12 on the thumb grid and the DPI stage up and down buttons simultaneously for three seconds to activate pairing mode. The status indicator will start blinking to show that the mouse is in pairing mode.
-
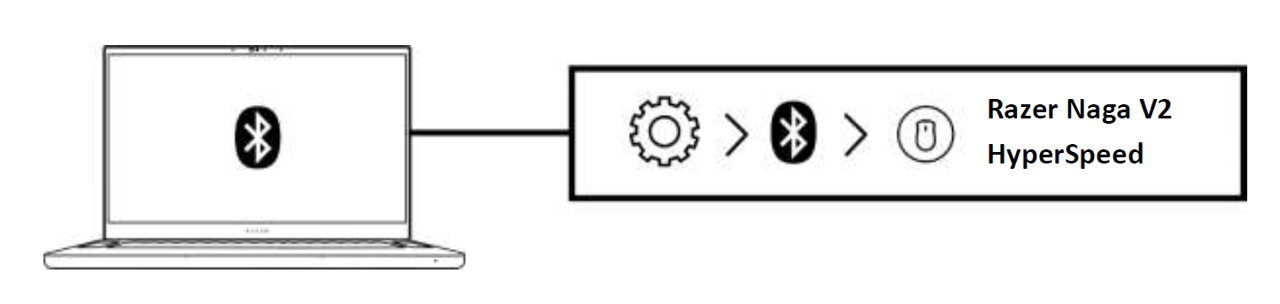
Activate Bluetooth on your device and select "Razer Naga V2 HyperSpeed" from the list of devices found.
-
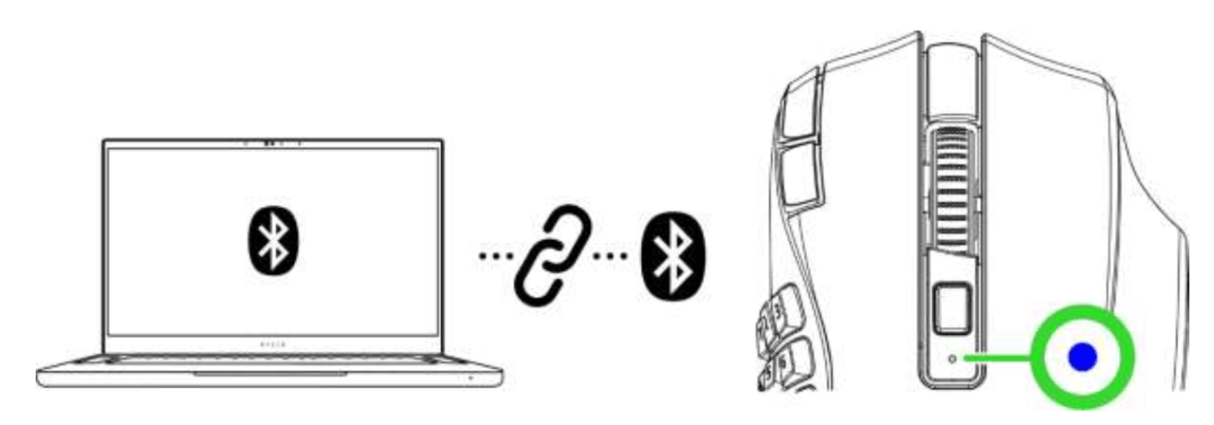
Wait until the mouse pairs with your device. The Razer logo will briefly turn static blue when paired.
Razer Naga Pro
-
Push the slider switch to Bluetooth mode.

-
Press and hold the scroll wheel, DPI stage up, and DPI stage down buttons simultaneously for three seconds to activate pairing mode. The Razer logo will blink twice in repeated intervals to show that the device is in pairing mode.

-
Activate Bluetooth on your device, search for new Bluetooth devices, and select "Razer Naga Pro" from the list of devices found.
-
Wait until the mouse pairs with your device. When paired, the Razer logo will briefly turn static blue before displaying its current lighting effect.

Note: Once paired, your Razer Naga Pro will automatically reconnect to your device whenever in Bluetooth mode and within range.
-
Keep the pairing devices within proximity of each other for a faster and more stable connection.
Your Razer Naga Pro is now connected to your PC via Bluetooth and ready to use.
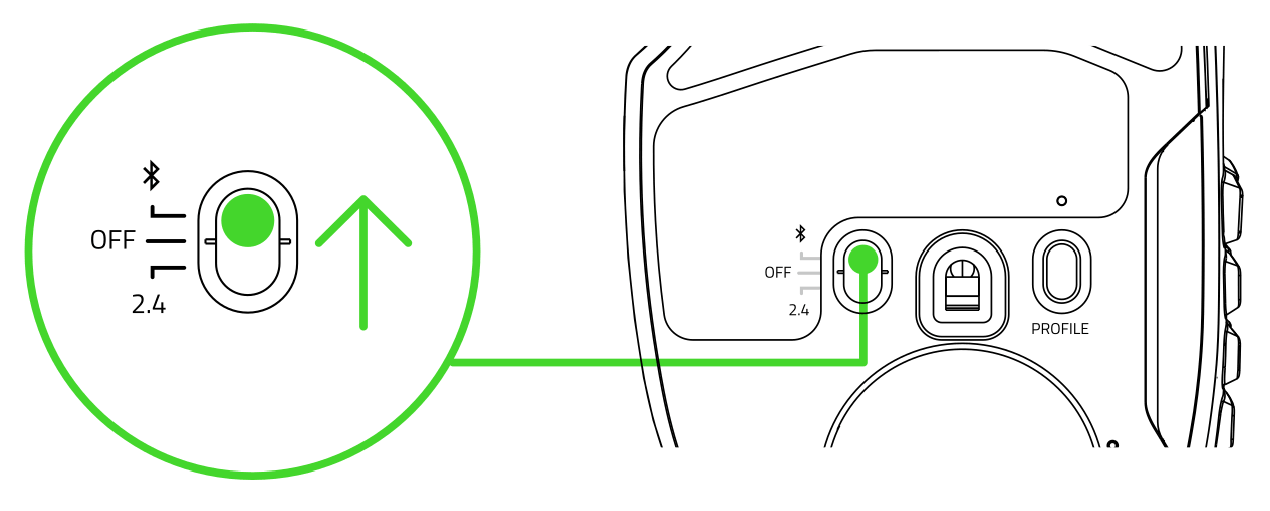
Razer Naga V2 Pro
-
Push the slider switch to Bluetooth mode.
-
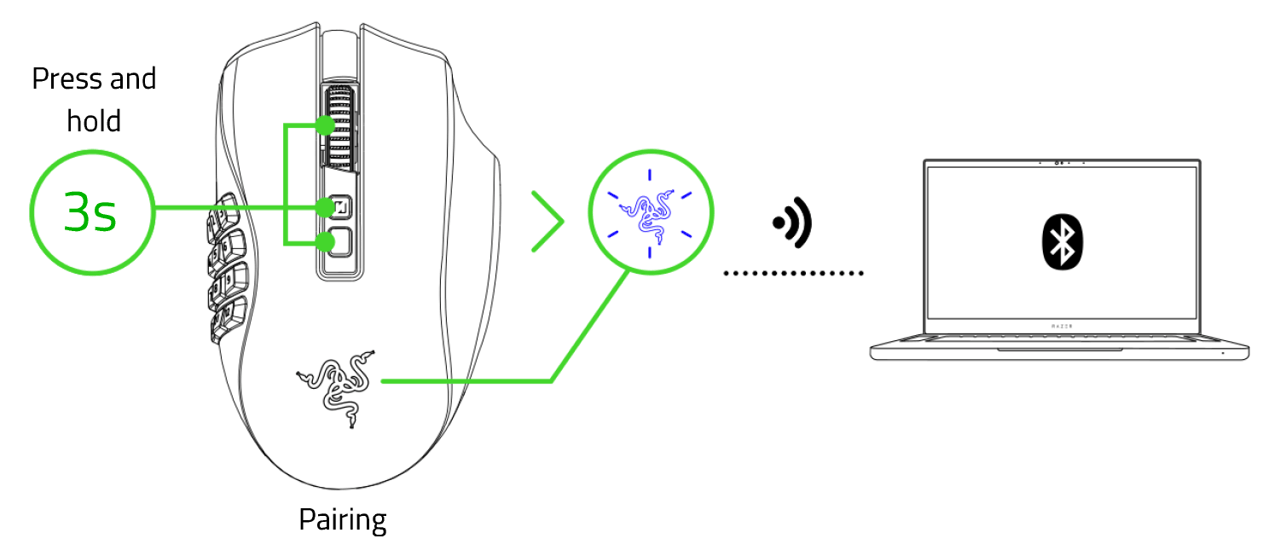
Press and hold the scroll wheel, scroll mode, and DPI cycle buttons simultaneously for three seconds to activate pairing mode. The Razer logo will blink twice in repeated intervals to show that the mouse is in pairing mode.
-
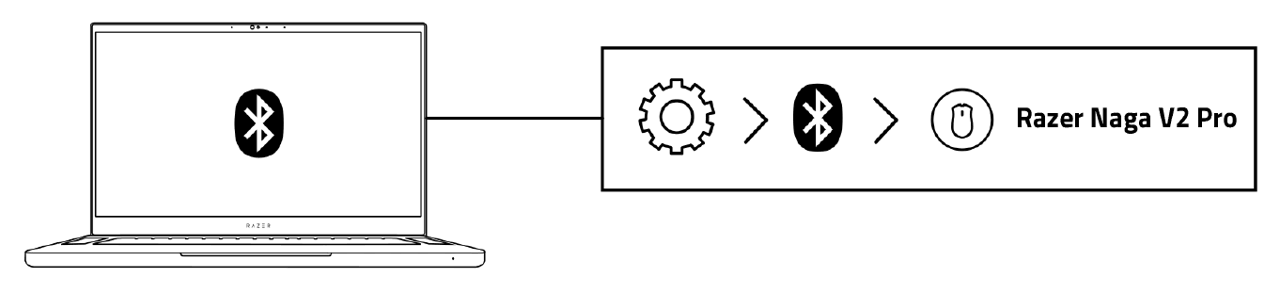
Activate Bluetooth on your device and select "Razer Naga V2 Pro" from the list of devices found.
-
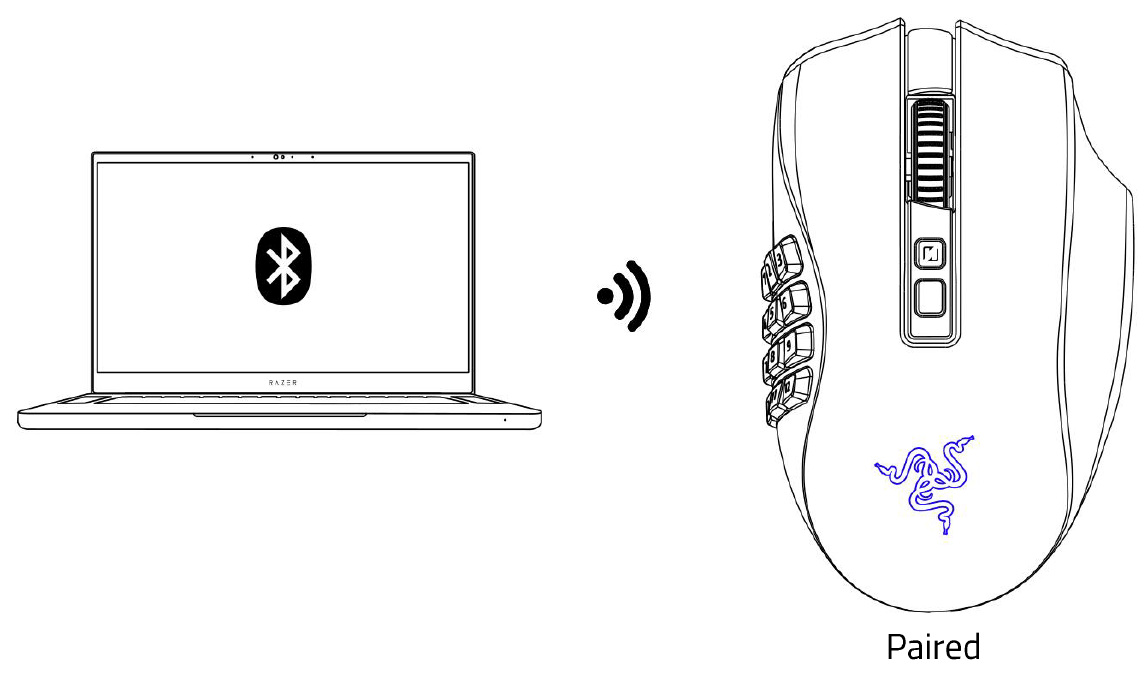
Wait until the mouse pairs with your device. The Razer logo will briefly turn static blue when paired.
Razer Orochi V2
-
Push the slider switch to Bluetooth mode.

-
Press and hold the two side buttons and the DPI cycle button simultaneously for three seconds to activate pairing mode. The status indicator will blink twice in repeated intervals to show that the device is in pairing mode.

-
Activate Bluetooth on your device and select “Razer Orochi V2” from the list of devices found.

-
Wait until the mouse pairs with your device. When paired, the status indicator will briefly turn static blue.

Note: Once paired, your Razer Orochi V2 will automatically reconnect to your device whenever in Bluetooth mode and within range.
-
Keep the pairing devices within proximity of each other for a faster and more stable connection.
Razer Pro Click
Note: You can connect the Razer Pro Click to more than one device.
-
Switch the slider at the bottom of the mouse to Bluetooth mode

-
Select a slot for your Bluetooth device by tapping the pair/switch button. The slots allow you to pair up to three Bluetooth devices on your Razer Pro Click.

-
Press and hold the pair/switch button for three seconds. The pairing indicator will blink twice in repeated intervals to show that the device is in pairing mode.

-
Activate Bluetooth on your device and search for "Razer Pro Click" from the list of devices found.

-
Wait until both devices are paired. When paired, the pairing indicator will change to static for three seconds before turning off.

Once both devices have been paired, your Razer Pro Click will automatically reconnect to the device whenever it is in Bluetooth mode and the device is within range.
Razer Pro Click Mini
-
Push the slider switch to Bluetooth mode.

-
Press the pair/switch button to select a slot for your Bluetooth device. You can pair up to three Bluetooth devices on your Razer Pro Click Mini. The pairing indicator will blink twice in repeated intervals to show that the mouse is in pairing mode.

-
Activate Bluetooth on your device and select "ProClick M" from the list of devices found.
-
Wait until both devices are paired. When paired, the pairing indicator will briefly change to static before turning off.

Razer Pro Click V2
-
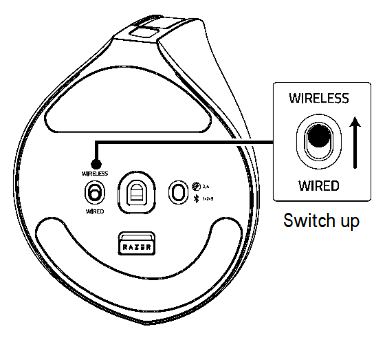
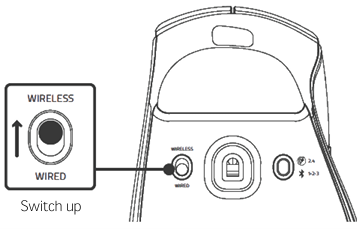
Switch the slider at the bottom of the mouse to “WIRELESS” mode.
-
Press the pair/switch button repeatedly.
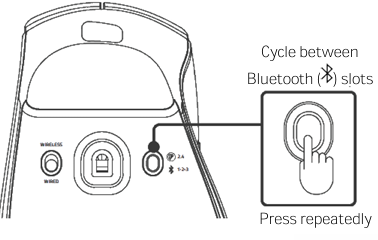
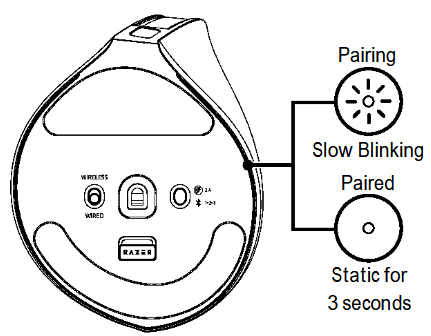
The pairing indicator will blink twice repeatedly to show that the device is in pairing mode.
Razer Pro Click V2 Vertical Edition
Note: You can connect multiple devices to the Razer Pro Click Vertical Edition.
-
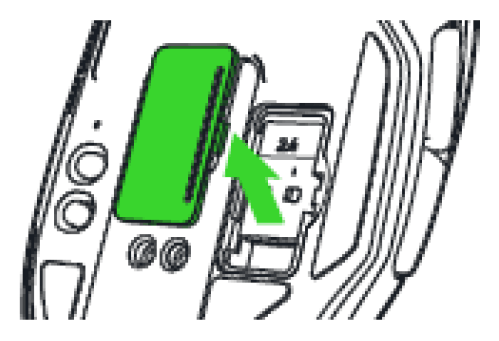
Switch the slider at the bottom of the mouse to “WIRELESS” mode.
-
Press the pair/switch button repeatedly.
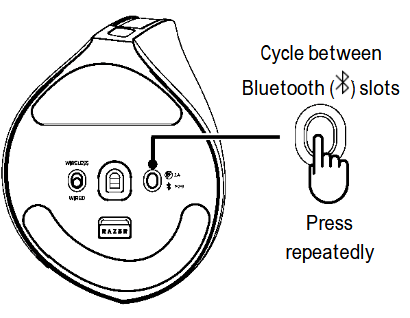
The pairing indicator will blink twice repeatedly to show that the device is in pairing mode.
-
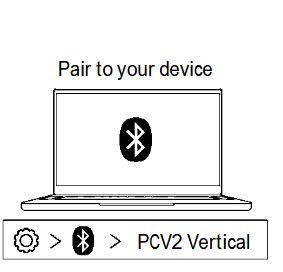
Activate Bluetooth on your device and search for "Razer Pro Click V2 Vertical Edition" from the list of devices found.
-
Wait until both devices are paired. When paired, the pairing indicator will change to static for three seconds before turning off.
Once both devices have been paired, your Razer Pro Click V2 Vertical Edition will automatically reconnect to the device whenever it is in Bluetooth mode and the device is within range.
Connect via USB Dongle
Razer Basilisk Ultimate
-
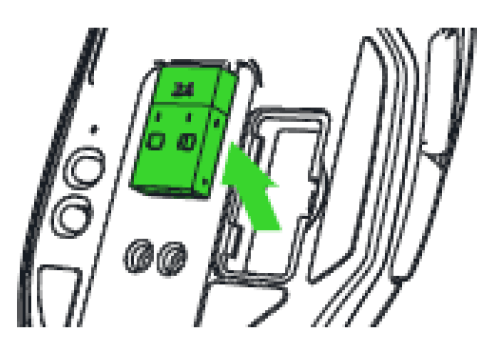
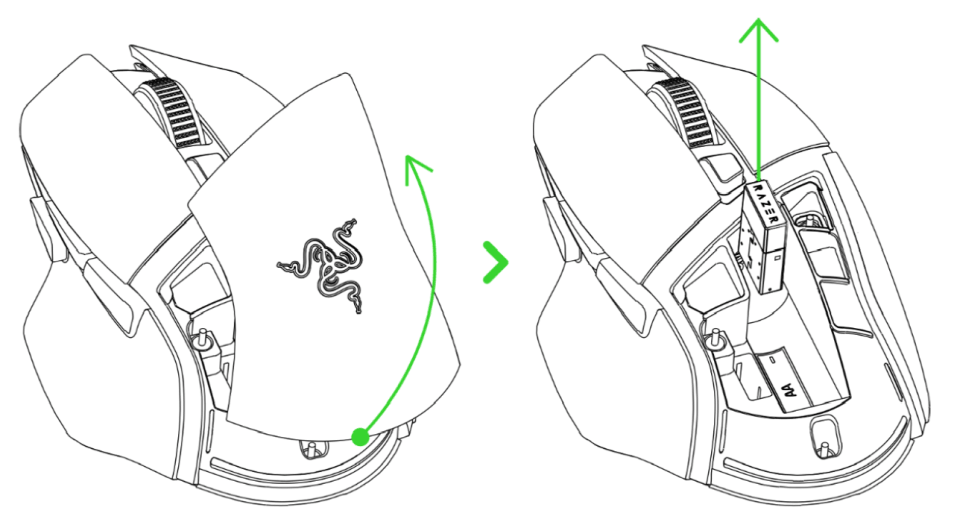
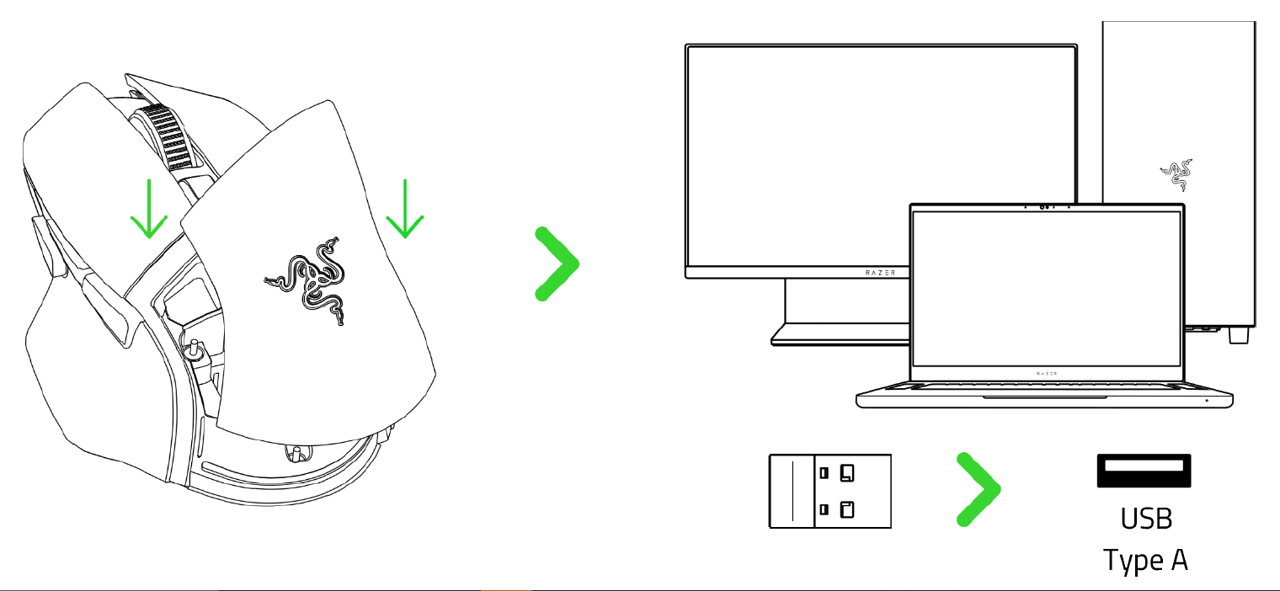
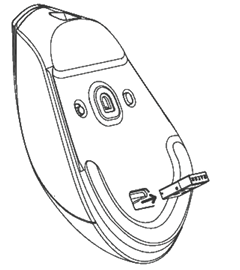
Remove the compartment cover from your Razer Basilisk Ultimate.
-
Remove the USB wireless dongle from your mouse.
-
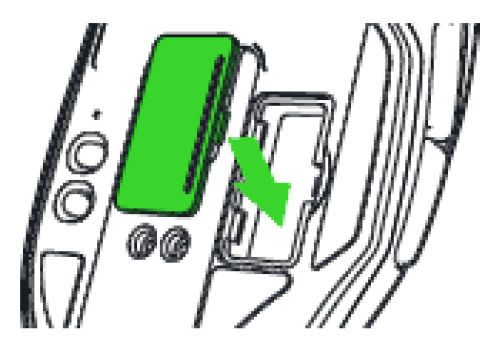
Reattach the compartment cover onto your Razer Basilisk Ultimate and make sure it is securely fastened.
-
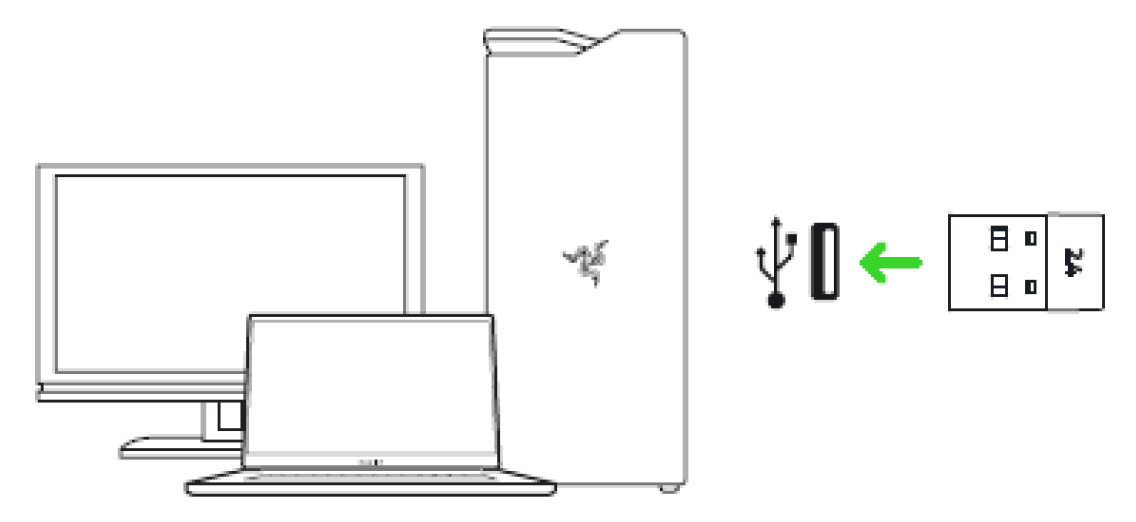
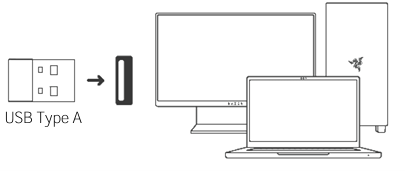
Insert the USB wireless dongle into your computer's USB port.
-
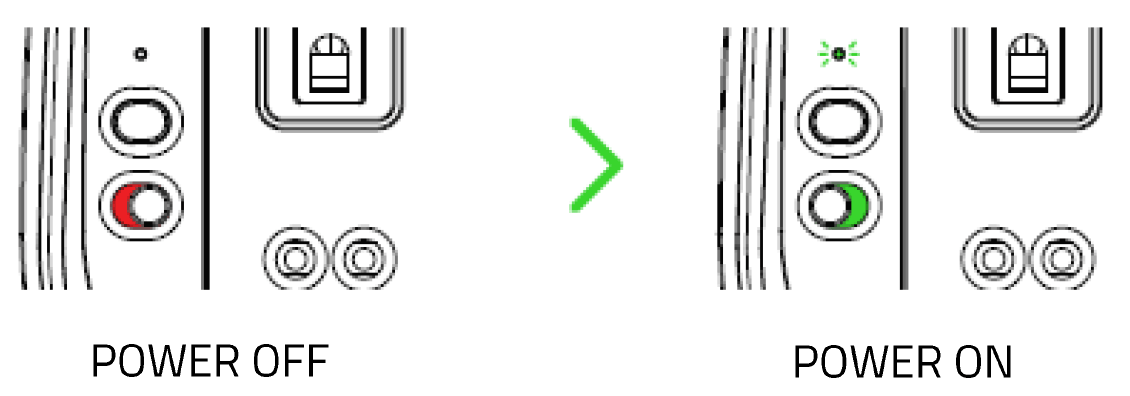
Switch on the Razer Basilisk Ultimate.
Razer Basilisk V3 Pro 35K
-
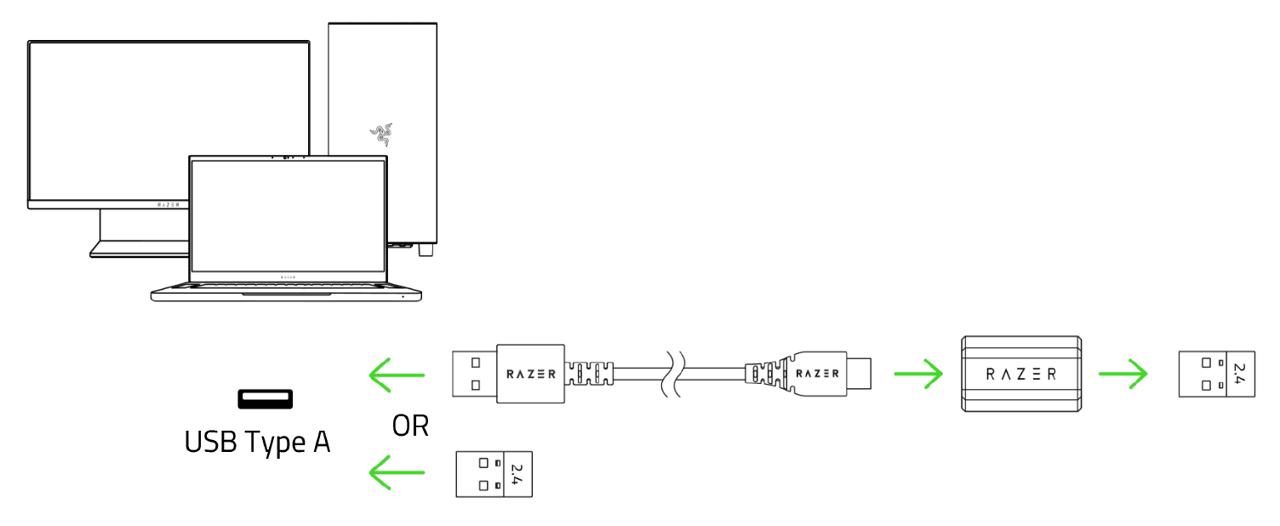
Connect the wireless dongle to your PC.
-
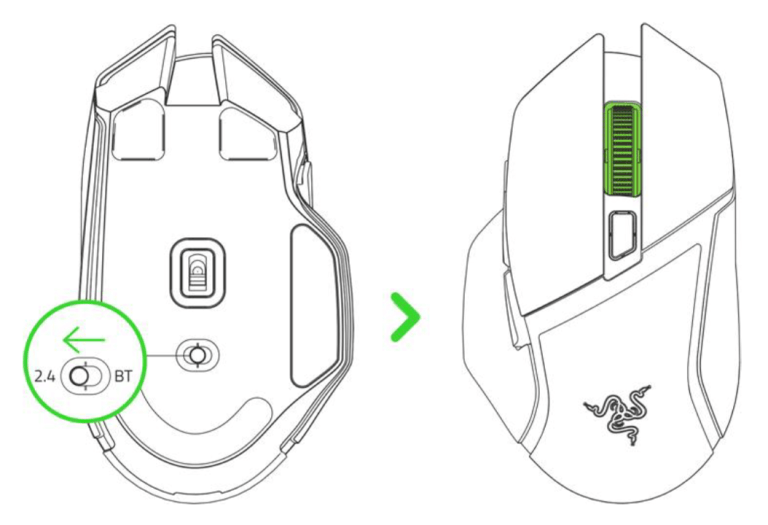
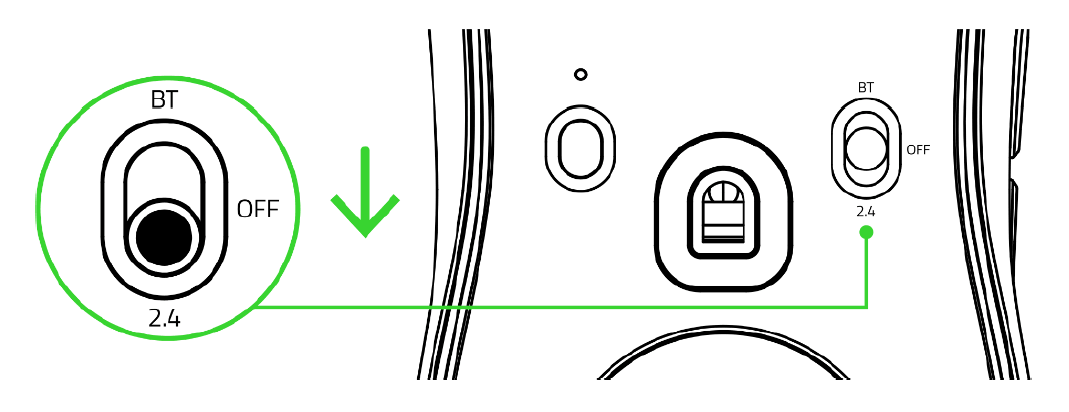
Push the slider switch to Razer HyperSpeed Wireless (2.4 GHz) mode.
-
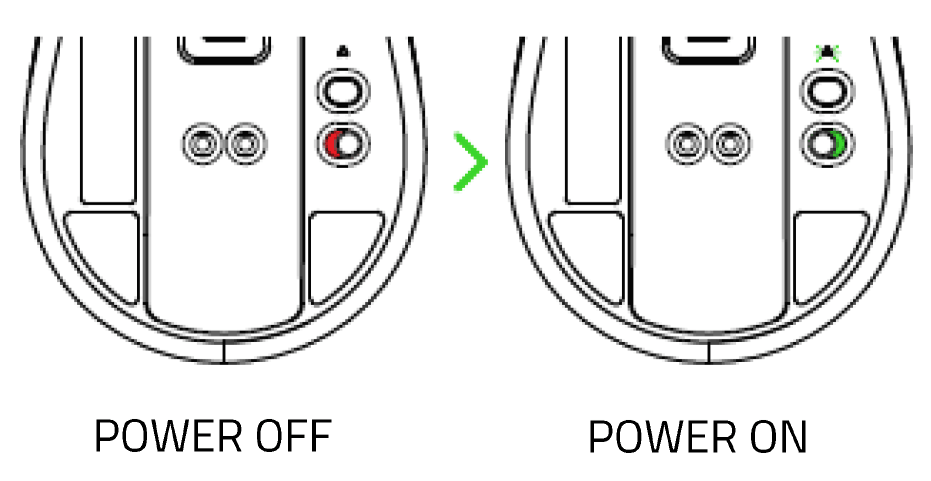
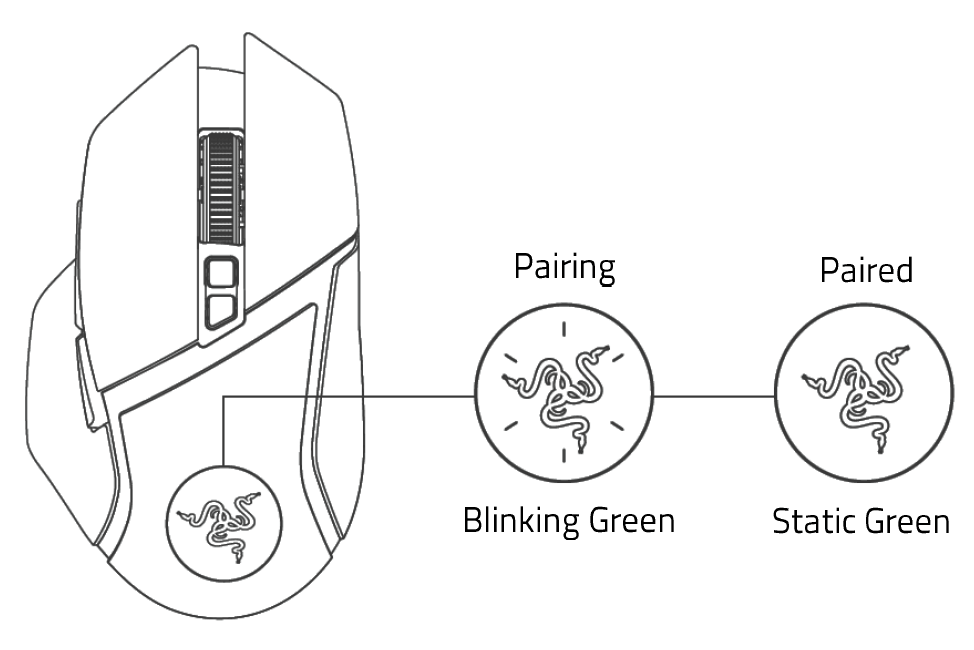
Wait until the mouse pairs with your device. When paired, the Razer logo will briefly turn static green.
Razer Basilisk V3 Pro
-
Plug the wireless USB dongle into your PC.

-
Push the slider switch to "2.4" GHz mode.

The Razer Basilisk V3 Pro is now ready for use in wireless mode.
Razer Basilisk X Hyperspeed
-
Remove the top cover of the Razer Basilisk X Hyperspeed and take the wireless USB dongle.

-
Close the top cover and connect the wireless USB dongle to the USB port of your computer.

-
Switch the slider to 2.4 GHz mode. The pairing indicator will start blinking rapidly.

-
Wait until the mouse automatically pairs with the wireless USB dongle. When paired, the pairing indicator will change to static white for 3 seconds before turning off.

Razer Basilisk V3 X HyperSpeed
-
Remove the top cover of the mouse and take out the wireless USB dongle.
-
Reattach the top cover and plug the wireless USB dongle into your PC.
-
Push the slider switch to Razer HyperSpeed Wireless (2.4 GHz) mode. When connected, the scroll wheel briefly turns static green.
Razer DeathAdder V3 HyperSpeed
-
Connect the wireless dongle to the PC.
-
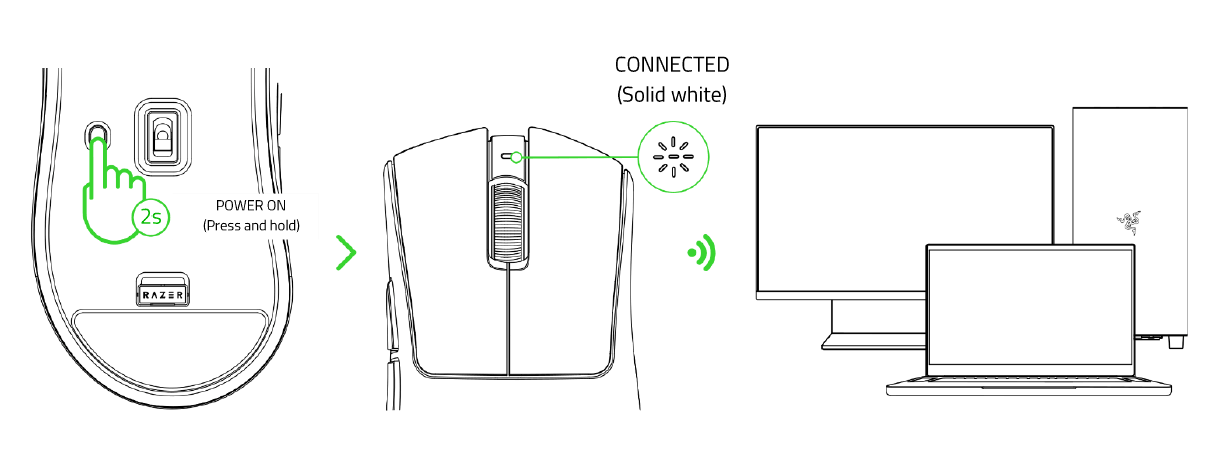
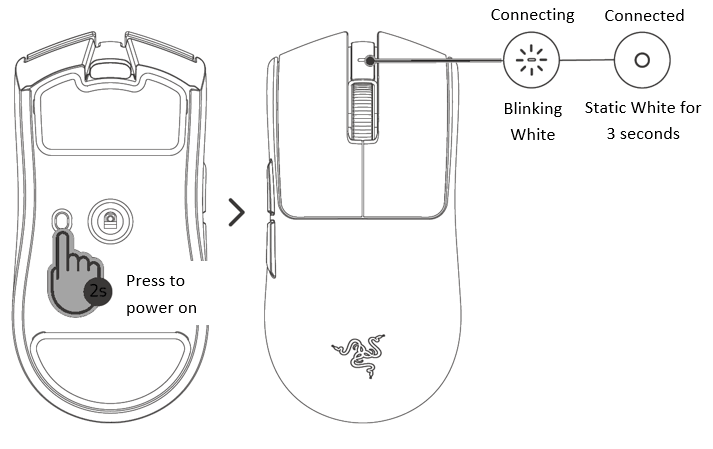
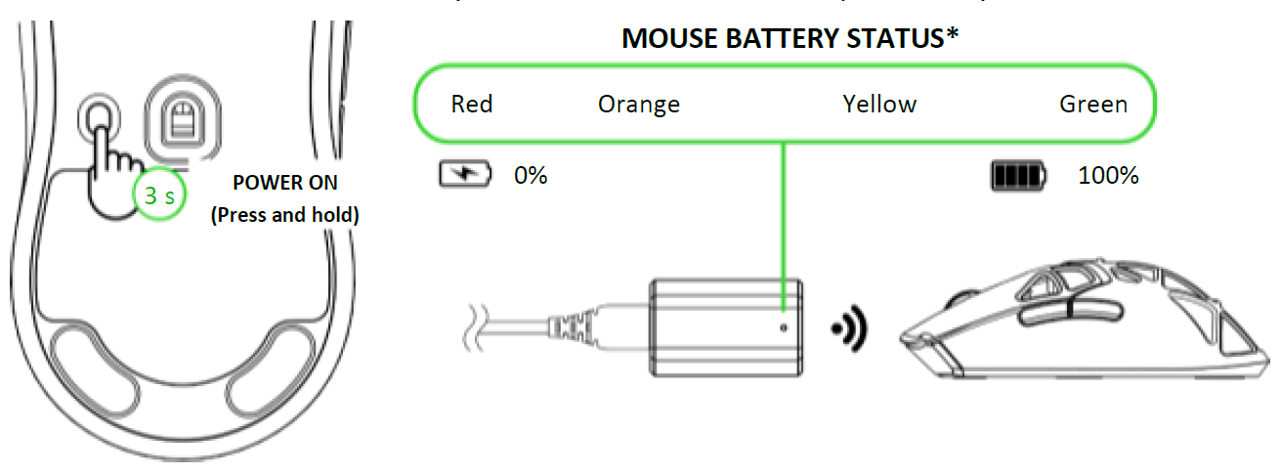
Press and hold the Power / DPI cycle button for two seconds to power on the mouse.
Razer DeathAdder V3 Pro
-
Plug the wireless USB dongle into your PC.
-
Press and hold the power / DPI cycle button for three seconds to power on the mouse.
Razer DeathAdder V2 X HyperSpeed
-
Remove the top cover of the mouse and take out the wireless dongle.

-
Close the top cover and insert the wireless dongle into any of the USB ports on your PC.

-
Push the slider switch to Razer™ HyperSpeed Wireless (2.4 GHz) mode. When connected, the status indicator will briefly turn static green.

Razer DeathAdder V2 Pro
-
Remove the compartment cover from the mouse to remove the wireless USB dongle.

-
Reattach the compartment cover and insert the wireless USB dongle into the USB port of your PC.

-
Push the slider switch to Razer™ HyperSpeed Wireless (2.4 GHz) mode.

Razer Cobra Pro
-
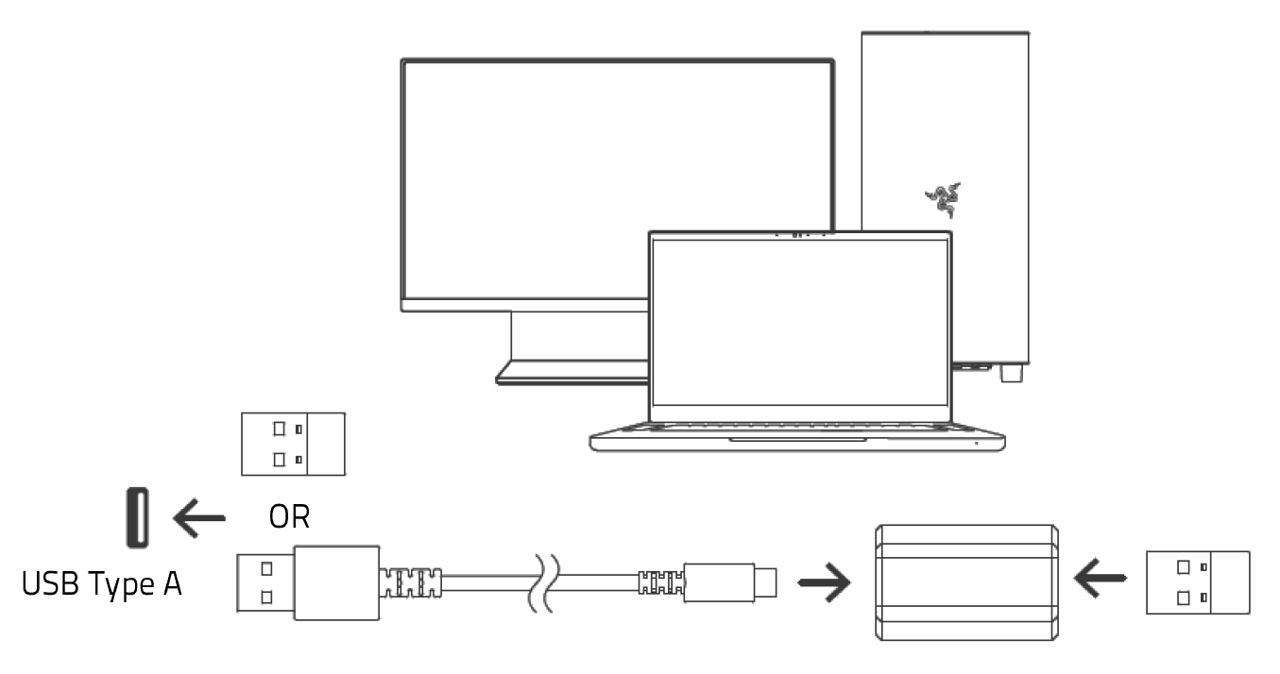
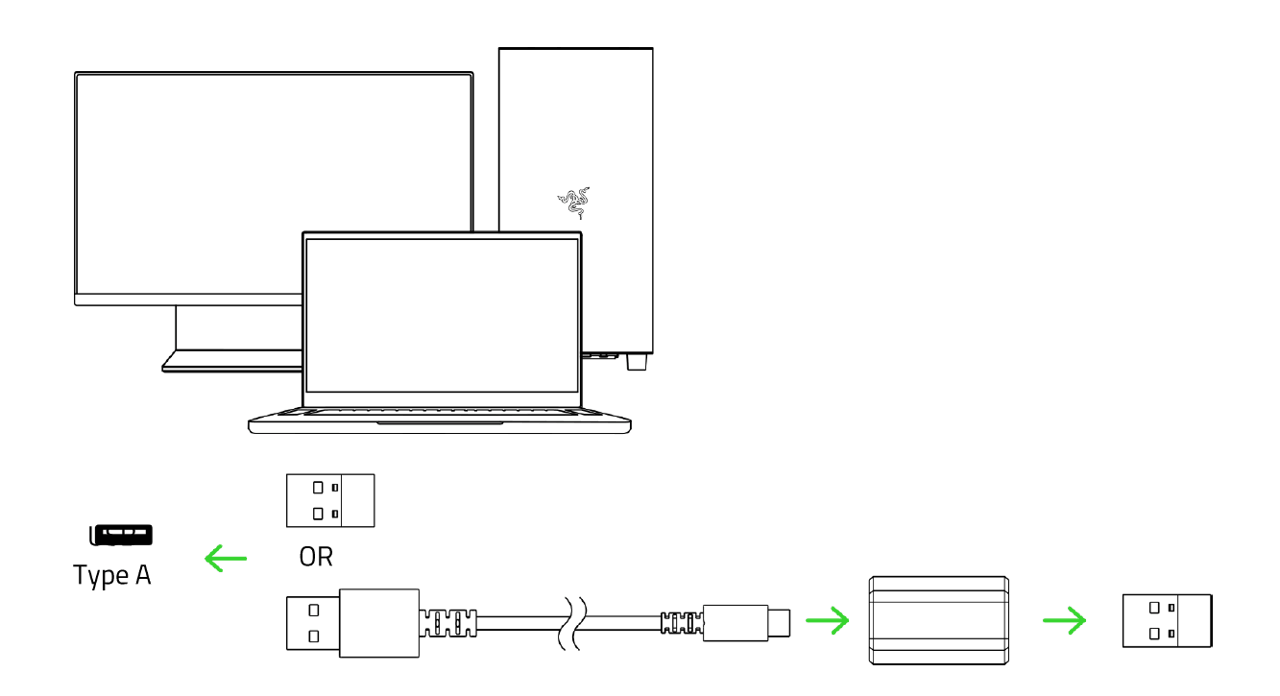
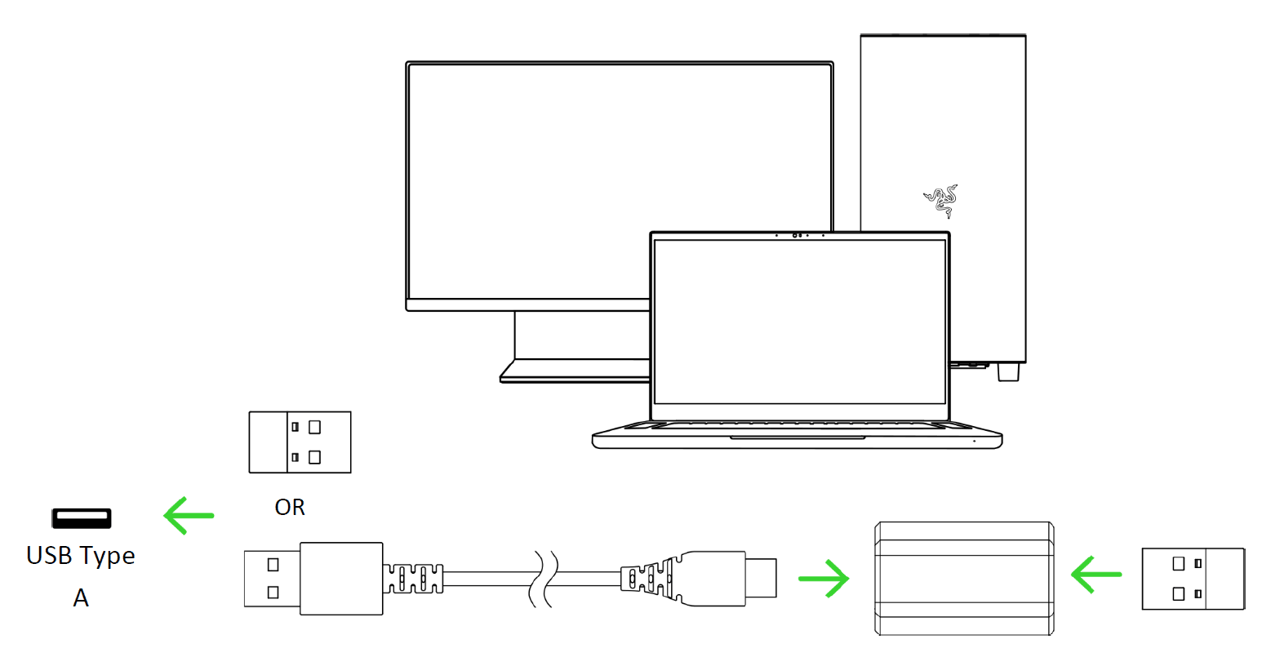
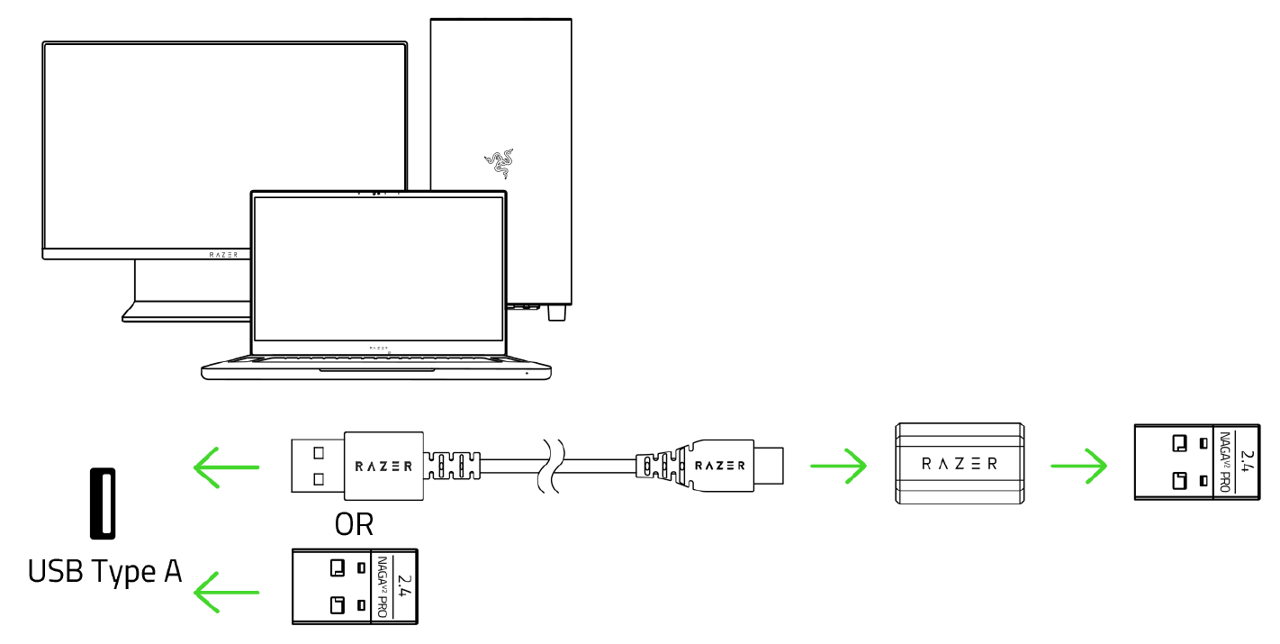
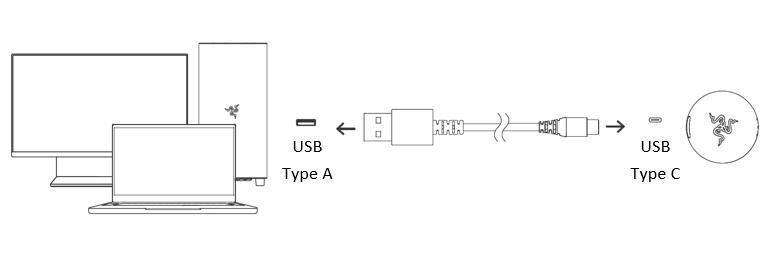
Connect the wireless dongle to your PC using the USB Type A to USB Type C cable.
-
Push the slider switch to Razer HyperSpeed Wireless (2.4 GHz) mode.
Razer Naga V2 HyperSpeed
-
Remove the top cover of the mouse and take out the wireless USB dongle.
-
Reattach the top cover and plug the wireless USB dongle into your PC.
-
Push the slider switch to Razer HyperSpeed Wireless (2.4 GHz) mode. When connected, the status indicator will briefly turn static green.
Razer Naga Pro
-
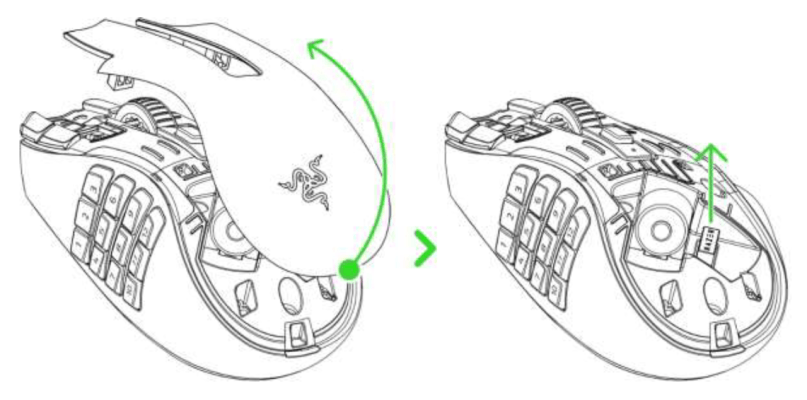
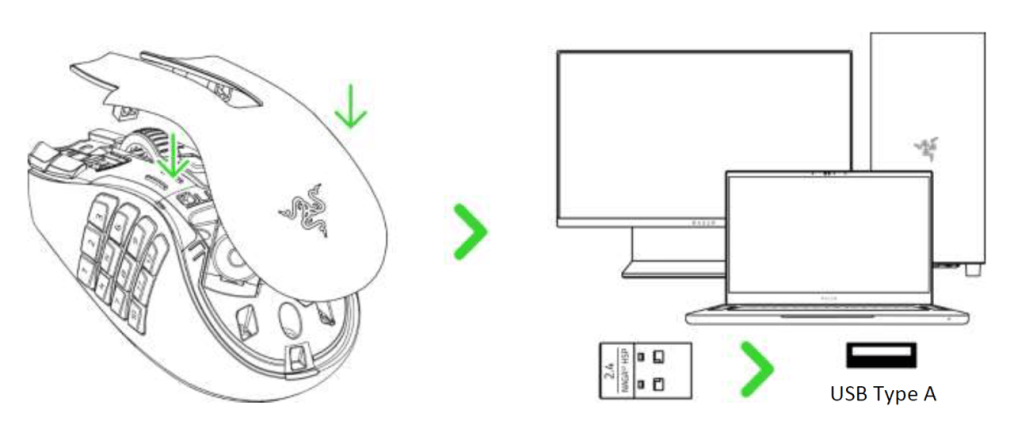
Remove the attached side plate from the mouse to remove the wireless USB dongle.

-
Reattach the side plate and insert the wireless USB dongle into the USB port of the PC.

-
If you have purchased the Razer Mouse Dock Chroma, follow these steps to connect the Razer Naga Pro wirelessly with the charging dock:
- Plug the charging cable from the computer's USB port to the charging dock.

- Insert the wireless dongle from the Razer Naga Pro to the USB port of the Razer Mouse Dock.

Note: With this setup, the included USB dongle adapter is no longer needed. The Razer Mouse Dock Chroma acts as both an extender and charging dock.
- Plug the charging cable from the computer's USB port to the charging dock.
-
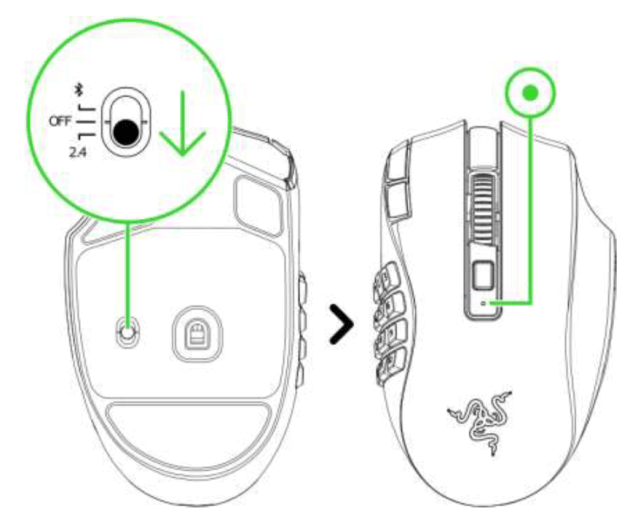
Push the slider switch to Razer™ HyperSpeed Wireless (2.4 GHz) mode.

The Razer Naga Pro is now ready for use in wireless mode.
Razer Naga V2 Pro
-
Plug the wireless dongle into your PC.
-
Push the slider switch to Razer HyperSpeed Wireless (2.4 GHz) mode.
Razer Orochi V2
-
Remove the top cover of the mouse and take out the wireless USB dongle.

-
Close the top cover and insert the wireless USB dongle into the USB port of your PC.

-
Push the slider switch to Razer™ HyperSpeed Wireless (2.4 GHz) mode. When connected, the status indicator will briefly turn static green.

Razer Pro Click
-
Remove the compartment cover of the Razer Pro Click and pull out the wireless USB dongle.

-
Close the compartment cover and connect the wireless USB dongle to the USB port of your computer.

-
Switch the slider to 2.4 GHz mode. The pairing indicator will start blinking rapidly.

-
Wait until the mouse automatically pairs with the wireless USB dongle. When paired, the pairing indicator will change to static white for 3 seconds before turning off.
Razer Pro Click Mini
-
Remove the top cover of the mouse and take out the Razer™ Productivity Dongle.

-
Close the top cover and insert the Razer™ Productivity dongle into the USB port of your PC.

-
Push the slider switch to Razer™ HyperSpeed wireless (2.4 GHz) mode. When connected, the pairing indicator will briefly turn static white.

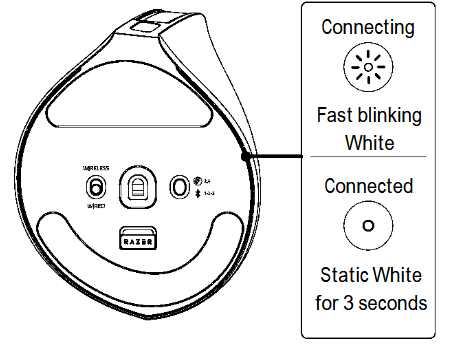
Razer Pro Click V2
-
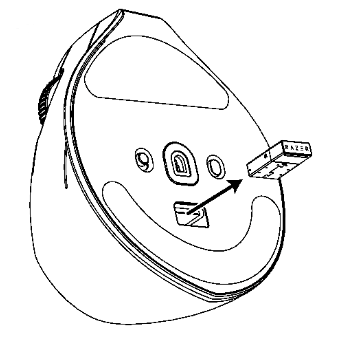
Pull out the wireless USB dongle.
-
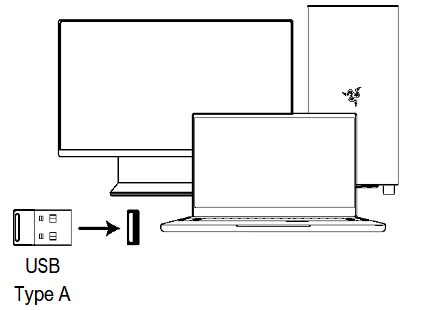
Connect the wireless USB dongle to the USB port of your computer.
-
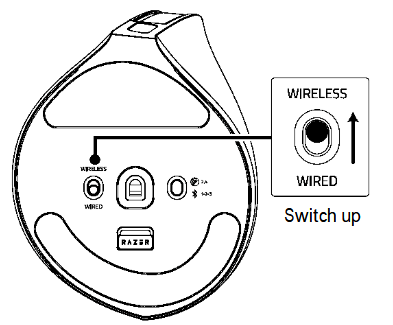
Switch the slider “WIRELESS” mode. The pairing indicator will start blinking rapidly.
-
Wait until the mouse automatically pairs with the wireless USB dongle.
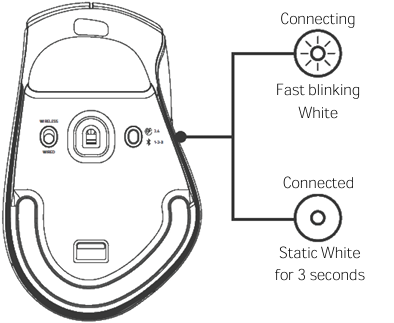
When paired, the pairing indicator will change to static white for three seconds before turning off.
Razer Pro Click V2 Vertical Edition
-
Pull out the wireless USB dongle.
-
Connect the wireless USB dongle to the USB port of your computer.
-
Switch the slider “WIRELESS” mode. The pairing indicator will start blinking rapidly.
-
Wait until the mouse automatically pairs with the wireless USB dongle.
When paired, the pairing indicator will change to static white for three seconds before turning off.
Razer Viper V4 Pro
-
Plug the wireless USB dongle into your PC.
-
Press and hold the Power / DPI cycle button for three seconds to power the mouse on.
Your Razer Viper V4 Pro is now ready for use in wireless mode.
Razer Viper Mini Signature Edition
-
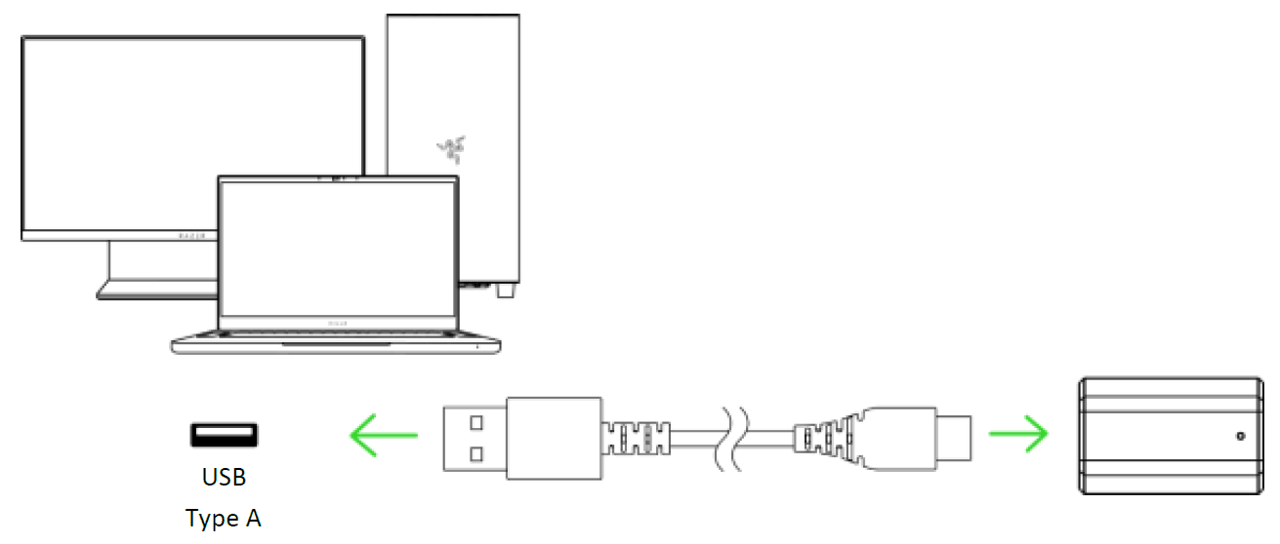
Connect the Razer HyperPolling Wireless Dongle of your mouse to your PC using the USB Type A to USB Type C cable.
-
Press and hold the Power / DPI cycle button for three seconds to power on your mouse.
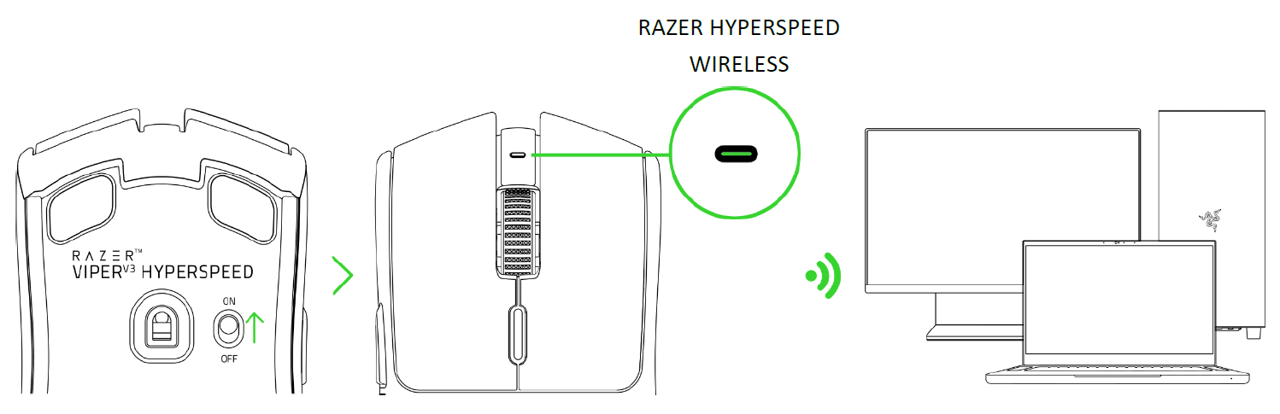
Razer Viper V3 HyperSpeed
-
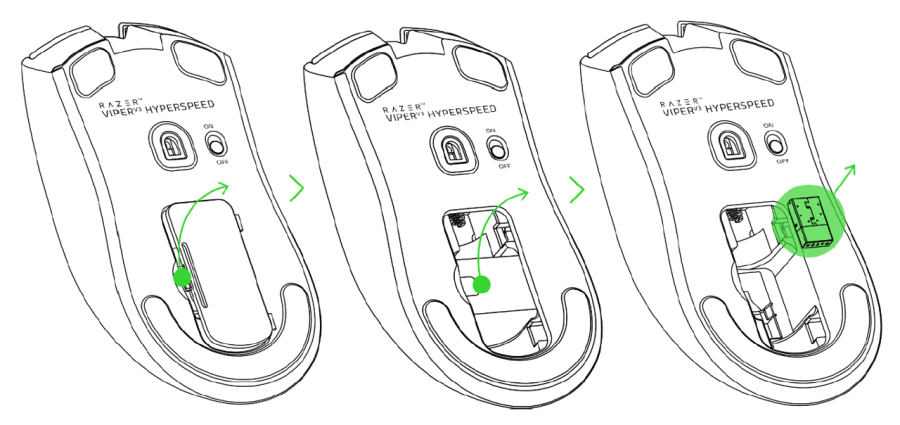
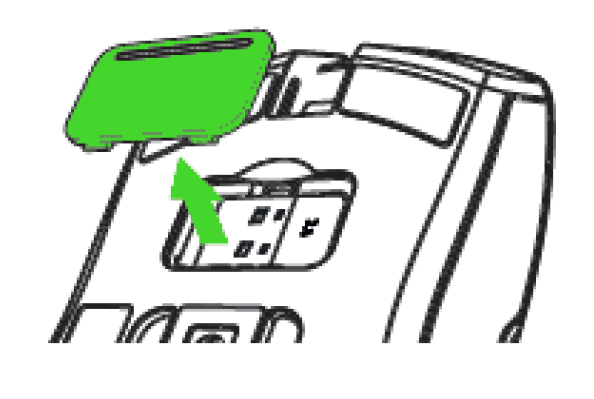
Remove the battery compartment cover and insert, and remove the wireless dongle.
-
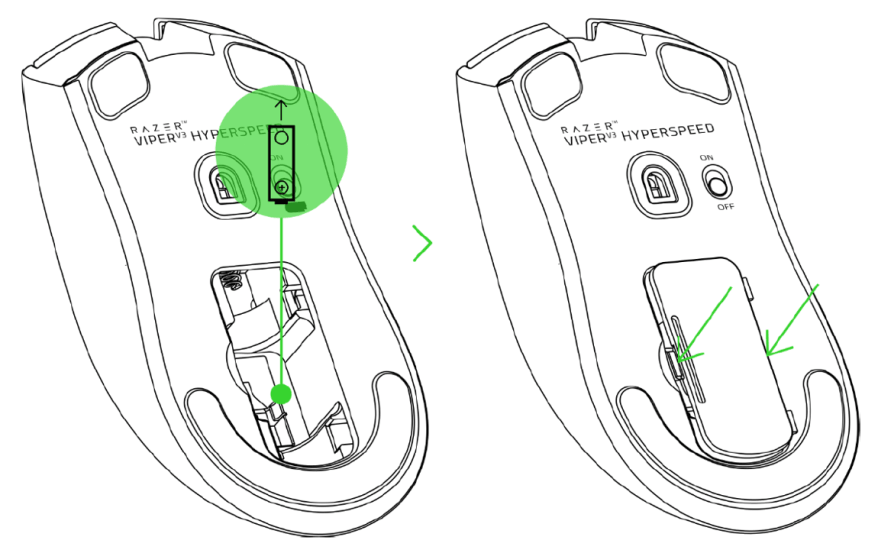
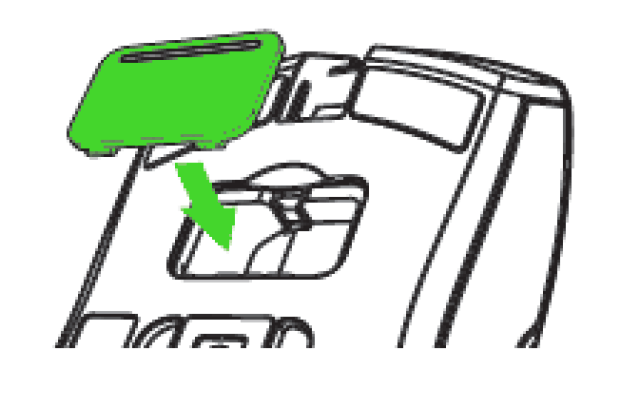
Insert the battery as indicated in the compartment and reattach the compartment cover.
-
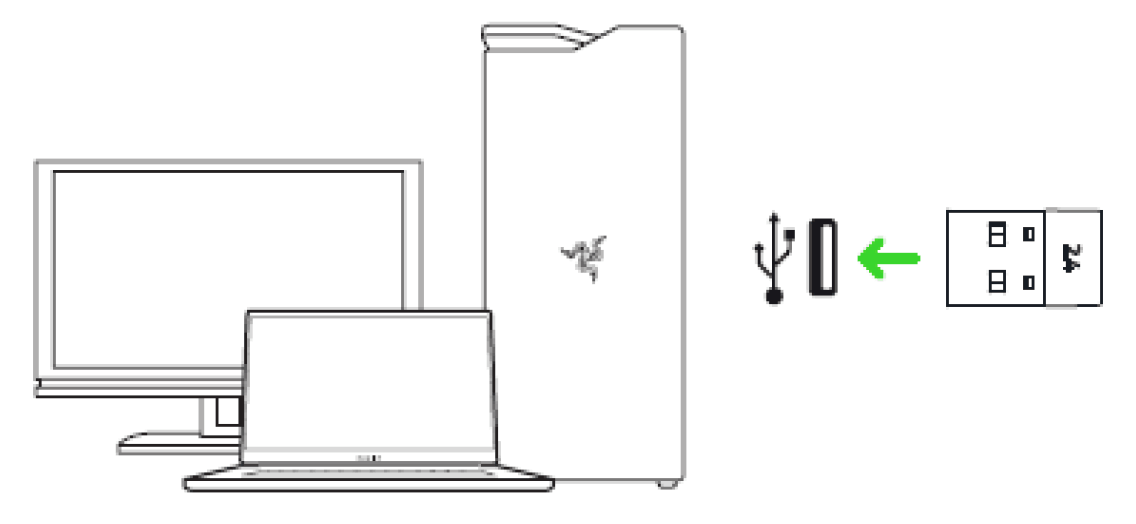
Insert the wireless dongle into any of the USB ports on your PC.
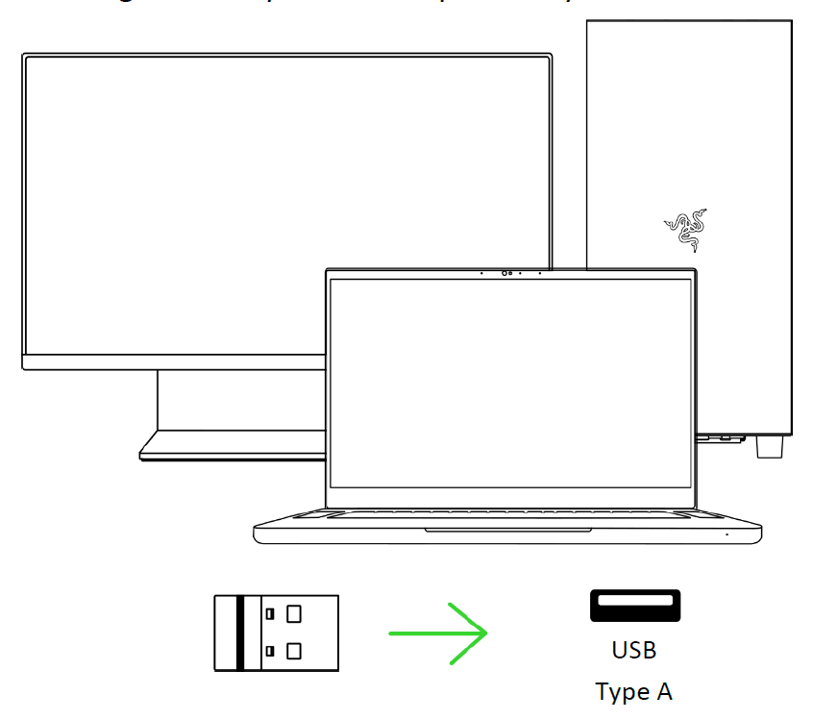
-
Switch on the mouse and wait for it to connect to the wireless dongle. The indicator LED will turn solid green to show that the mouse is connected to the wireless dongle.
Razer Viper V3 Pro
-
Connect the Razer HyperPolling Wireless Dongle to your PC.

-
Press and hold the Power / DPI cycle button for two seconds to power on your mouse.

Your Razer Viper V3 Pro is now ready for use in Razer HyperSpeed Wireless (2.4 GHz) mode.
Razer Viper V2 Pro
-
Plug the wireless USB dongle into your PC.

-
Press and hold the Power / DPI cycle button for three seconds to power the mouse on.

Your Razer Viper V2 Pro is now ready for use in wireless mode.
Razer Viper Ultimate
-
Remove the compartment from your Razer Viper Ultimate.
-
Remove the USB wireless dongle from your mouse.

-
Reattach the compartment cover onto your Razer Viper Ultimate and make sure it is securely fastened.
-
Insert the USB wireless dongle into your computer's USB port.
-
Switch on the Razer Viper Ultimate.