
This is a step-by-step guide on how you can resolve 7.1 Surround Sound issues with your Razer Kraken headset. This solution can be performed on any Razer Kraken headset activated with the 7.1 Surround Sound application.
Note: Ensure 7.1 Surround Sound is activated before troubleshooting any issues.
Select audio issue
Distorted Audio or Unwanted Noise
-
Open the Control Panel. There are two most common ways to do this:
-
Enter “control panel” in the search function.

-
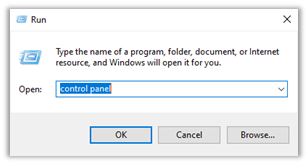
Press “Windows key + R” keys on your keyboard then type “control panel” and click “OK”.

-
-
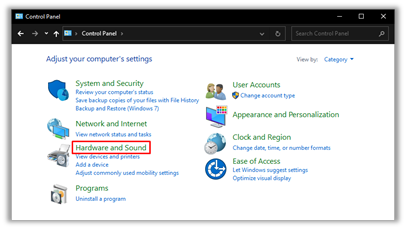
In the Control Panel, click on “Hardware and Sound”.

-
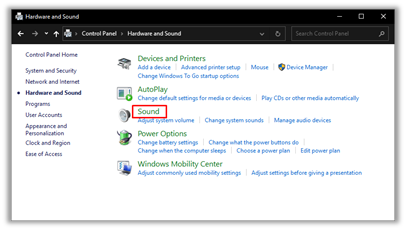
Click “Sound”.

-
Click on “7.1 Surround Sound”, then click on “Properties”.

-
Click on the “Advanced” tab of the Speaker Properties.

-
Uncheck all options under “Exclusive Mode” and “Signal Enhancements”, then click “OK”.

The unwanted noise or distorted audio issue should be resolved.
Very Low or No Audio
-
In the Control Panel, click on “Hardware and Sound”.

The very low or no audio issue should be resolved.
If the step above does not resolve the issue, perform the following:
-
Open the Control Panel. There are two ways to do this:
-
Enter “control panel” in the search function.

-
Press “Windows key + R” keys on your keyboard then type “control panel” and click “OK”.
-
-
In the Control Panel, click on “Hardware and Sound”.
-
Click “Sound”.
-
Check the properties of “7.1 Surround Sound” and your default output device.
-
7.1 Surround Sound
-
Select Speakers - 7.1 Surround Sound, then click on Properties.
-
Click on the Advanced Tab.

-
-
Default Output Device
-
Select your default output device (Speakers – Realtek Audio), then click on Properties.
-
Click on the Advanced Tab.

-
-
-
Click on the “Advanced” tab of the speaker properties.
-
Ensure both 7.1 Surround Sound and the default output device have the same frequency (Hz) values under “Default Format”.

Note: 7.1 Surround Sound can only support up to 48000 Hz, so your default output device should match it.
Your very low or no audio problem should be resolved. You should be able to hear your audio from your system.

