
Effective February 3, 2026, Razer Synapse 3 will no longer receive updates or support cloud services. After this date, cloud syncing of configurations across PCs using the same Razer ID will be disabled.
Note: Your installed devices will continue to be configurable in Razer Synapse 3. However, if you uninstall these devices completely, you will need to upgrade to Razer Synapse 4 to continue customization.
Download Razer Synapse 4 and migrate your existing Razer Synapse 3 profiles using the Profile Migration Tool to retain access to your configurations. See How to migrate your Razer Synapse 3 Profile to Razer Synapse 4 for instructions.
If your Razer mouse is not functioning correctly after surface calibration, it is likely due to improper calibration. Recalibrate the sensor of your mouse to resolve this issue.
See the step-by-step instructions below on how to recalibrate your Razer mouse.
Choose an option
Razer Synapse 4
-
Launch Razer Synapse 4.
-
Select your mouse from the DASHBOARD.
-
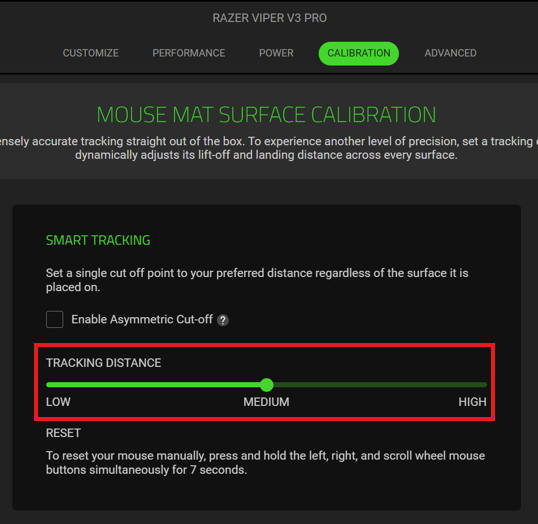
Click on “CALIBRATION”.

-
Adjust the surface calibration by dragging the slider to set the desired TRACKING DISTANCE. The options are LOW, MEDIUM, and HIGH.
-
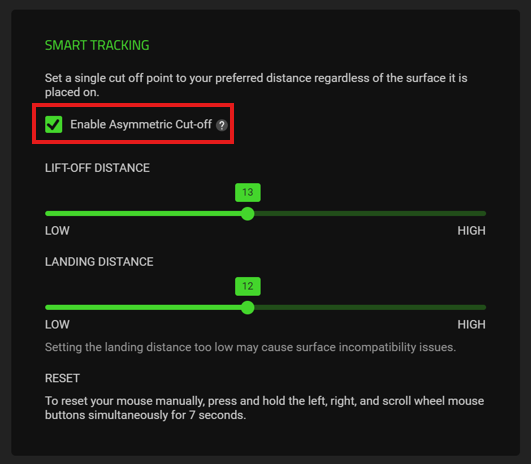
Additionally, you can check “Enable Asymmetric Cut-off” to dynamically adjust both the LIFT-OFF DISTANCE and LANDING DISTANCE across every surface.
-
Your mouse will apply your calibration settings immediately.
-
After recalibration, test your mouse to ensure it is functioning correctly.
Razer Synapse 3
Supported Razer Mats
-
Click on your mouse under “DEVICES” in the Razer Synapse Home page.

-
Click on “CALIBRATION” on the Mouse window.
-
Click on “ADD A SURFACE” to start the calibration process.

-
Select the surface/mat that you are using for the mouse.
-
Click on the “CALIBRATE” button to initiate the calibration.

Custom Calibration
-
Click on your mouse under “DEVICES” in the Razer Synapse Home page.
-
Click on “CALIBRATION” on the Mouse window.
-
Click on “ADD A SURFACE” to start the calibration process.
-
Select "CUSTOM" from the list of mouse mats.
-
Click "START".
-
Left-click, then move your mouse in a downward zig-zag motion while hovering back and forth between the left and right edges of the mat. Do this continuously until you reach the bottom-right corner of the mat.

-
From the bottom-right corner of the mat, move your mouse in a leftward zig-zag motion while hovering back and forth between the top and bottom edges of the mat. Do this continuously until you reach the top-left corner of the mat.

-
Left-click again. You will be notified that the calibration is completed.
-
Click "DONE".

