
Effective February 3, 2026, Razer Synapse 3 will no longer receive updates or support cloud services. After this date, cloud syncing of configurations across PCs using the same Razer ID will be disabled.
Note: Your installed devices will continue to be configurable in Razer Synapse 3. However, if you uninstall these devices completely, you will need to upgrade to Razer Synapse 4 to continue customization.
Download Razer Synapse 4 and migrate your existing Razer Synapse 3 profiles using the Profile Migration Tool to retain access to your configurations. See How to migrate your Razer Synapse 3 Profile to Razer Synapse 4 for instructions.
See the step-by-step instructions below on how to create macros on your Razer mouse.
Choose an option
Razer Synapse 4
-
Plug a mouse into your computer.
-
Open Razer Synapse 4.
-
Select "MACRO" > "New Macro".

Note: By default, macro profiles will be named Macro 1, Macro 2, and so on.
-
Rename your macro for easier identification.
- Click on the macro to rename.
- Click the ellipsis button then click “Rename”.

- Enter your desired macro name.

-
Record your keystrokes or mouse functions to add to the macro.
- Click the drop-down button next to RECORD.
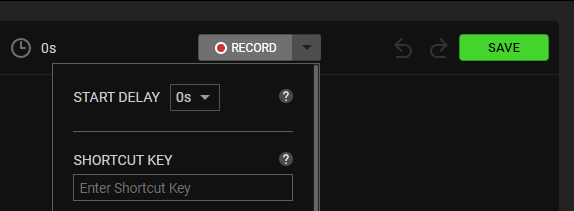
- Set the delay functions and how the mouse movement is recorded. If you select Record Delay, there is a countdown before Razer Synapse 4 starts recording.

- Click “RECORD”.
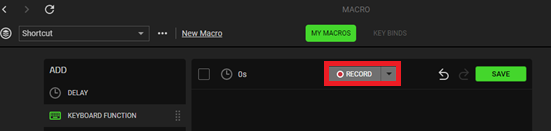
- Click “STOP” to stop recording.

- Click “SAVE” to save your recorded macro.

- Click the drop-down button next to RECORD.
Once your macro is saved, you can then assign it to any applicable Razer Synapse-enabled product.
Razer Synapse 3
-
Open Razer Synapse.
-
Go to "MACRO".
Note: If the "MACRO" tab is not found, see How to restore a missing module in Synapse 3.
-
Click on "+" beside "MACRO LIST".

-
Click on "Record". You can also assign a "Shortcut Key" if preferred.
-
Click on the "START" button.

-
Start performing the actions you want after three seconds.

-
Click "STOP" once done recording.

-
Click on the macro to rename then hit enter or click on "✓" to save changes.

-
If you want to delete a macro, click on "…" and select "Delete".

-
Click "DELETE" to confirm the deletion.

-
To delete a command within the macro, click on the delete icon that appears when you hover your cursor on the command.

You have successfully created a macro on your Razer Mouse.

