
End of Support Notice
Razer Synapse 3: Updates and cloud services are no longer supported, effective February 3, 2026.
Razer Synapse 2.0: Cloud‑related features are no longer supported, effective October 28, 2025.
For more details, including a guide on how to migrate profiles, visit the links below.
Distorted, muffled, buzzing noise, or static issues on a Razer headset mic are possibly caused by the following:
- Dirt or debris in audio ports and on audio jack
- Improperly attached mic and audio jack
- Hub connections
- Software issues
- Faulty audio drivers
You can view the video below for instructions or review a copy of the video transcript.
The following steps will help resolve headset microphone quality issues such as:
- Distorted, muffled, static, or buzzing sound
- Microphone is too sensitive or not sensitive enough
- Microphone is not working, unresponsive, or not picking up sound
- Voice fading issues
Select headset type for instructions
For All Headsets
-
Make sure the mic diaphragm is in front and the air vent is facing away from your mouth.

-
Make sure that the apps can access the mic. Go to Settings > Privacy > Microphone.
-
Turn on mic access on the selected app.

-
Set Device as a Default Recording Device.
-
Open Sound settings by pressing the Windows button on your keyboard, type "Sound" and press enter.
-
Click "Sound Control Panel" under "Related Settings".

-
Go to "Recording", right-click on the computer’s sound device.
-
Check both the Default Device and Default Communication Device.

-
Test the mic after setting the computer's mic as a default device. The indicator right beside the mic icon will lit up green if the voice is picked up.
-
Under "App volume and device preferences", check that the settings are set to "Default".
-
Go to Settings > System > Sound.
-
Click "App volume and device preferences" under "Advanced sound options".
-
Set the app "Input" and "Output" as "Default".

-
-
Adjust Mic Levels in Windows settings.
-
Right-click on the speaker icon on the System tray.
-
Select "Open Sound settings".

-
Under "Related Settings", click "Sound Control Panel".

-
Go to "Recording".
-
Right-click on the mic then click Properties.

- Go to "Levels".
- Adjust the "Microphone" and "Microphone Boost" to lower values. Higher levels can cause the mic to be more sensitive.

-
The mic’s sensitivity will function according to the set levels. Go to "Listen".
-
Check "Listen to this device" and apply the change to assess how the mic sounds.
-
Go to "Communications", then test each option.
-
Apply what works well.

-
-
Go to Control Panel > Sound > Recording > Properties > Enhancements.
-
Select "Disable all sound effects" or try a combination of enhancements that works for your setup.
-
Under Properties, go to Advanced Default Format.
-
Select "2 channel, 16 bit, 48000Hz (DVD Quality)" if available.
3.5 mm Headsets
-
For headsets with detachable mic, make sure that the mic is properly attached.
-
Check the audio ports and audio jack for any dirt or debris that can cause the issue and that the audio jack is securely inserted into the audio port. A Q-tip and cloth can be used to clean the audio jack and ports.
-
Reinstall the audio drivers.
-
Press Windows key + S on the keyboard to open the Search bar.
-
Type in "Device Manager" and hit enter.
-
Expand "Audio inputs and outputs".
-
Right-click on "Speakers (Realtek High Definition Audio)".
-
Select "Uninstall device".

-
Restart the computer. The drivers are automatically installed after the restart.
-
-
Test the headset on a different device to isolate the issue. If the headset is working properly on a different device, there could be hardware issue on your computer. Have it checked by the manufacturer or a reputable technician.
USB Type Headsets
-
For headsets with detachable mic, check that the mic is properly attached.
-
Check for Razer Synapse updates:
-
For wired USB headsets, ensure the device is plugged in directly to a PC and not a USB hub.
-
For wireless USB headsets, ensure the device is not subject to wireless interference. Turn off or disable any other wireless devices or move away from them, to avoid interference.
-
Disable Audio Enhancements.
Synapse 4:
-
Open Razer Synapse 4, select your device, then go to “MIC".
-
Ensure “MIC ENHANCEMENT" is disabled.
-
Enable the "SIDE TONE" feature to directly check through the headset if the mic quality has improved.

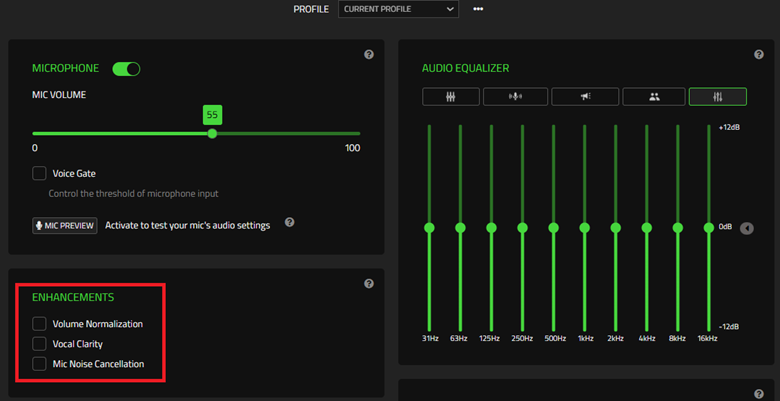
Synapse 3:
-
Open Razer Synapse 3 and select your device.
-
Go to “MIC".
-
Ensure all the boxes under “MIC ENHANCEMENT" are unchecked.
-
-
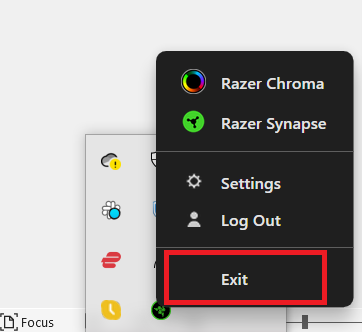
Disable Razer Synapse.
-
Right-click the Razer Synapse icon found in the system tray.
-
Select "Exit".
-
-
If the headset works without Razer Synapse, do a clean reinstall of Razer Synapse, see How to re-install Razer Synapse on Windows.
-
Uninstall headset drivers.
-
Press Windows key + S on the keyboard to open the Search bar.
-
Type in "Device Manager" and hit enter.
-
Go to "Audio inputs and outputs".
-
Right-click on the Razer headset and select "Uninstall device".
-
Restart the computer. The drivers are automatically installed after a restart.
-
-
Test the headset on a different device to further isolate the issue. If the headset is working properly on a different device, there could be hardware issue on your computer. Have it checked by the manufacturer or a reputable technician.
Bluetooth Headsets
-
Ensure the headset is turned on and properly charged.
-
Check for Razer Synapse updates:
-
Ensure the device is not subject to wireless interference. Turn off or disable any other wireless devices or move away from them, to avoid interference.
-
When the headset is used with a PC, ensure the "Hands-Free AG Audio" is set as the default communication device.
-
Go to Settings > System > Sound, and then click "Sound Control Panel" under "Related Settings".
-
Go to "Recording", set "Hands-Free AG Audio" as the "Default Communication Device".

-
Go to "Playback", set "Hands-Free AG Audio" as the "Default Communication Device".

-
-
Unpair and re-pair the headset to the Bluetooth device. Ensure both devices are within the one-meter range.
Note: Steps on how to pair the Bluetooth device vary. Refer to the appropriate product master guide.
- Test the headset on a different Bluetooth-compatible device to further isolate the issue. If the headset is working properly on a different device, the root cause may lie on the computer or device. Have it checked by the manufacturer or a reputable technician.

